SSRS – Calculate an Upcoming Quarter

Here is a quick hack of SQL Server Reporting Services to calculate an upcoming quarter (for the parameter fields).  It will do this for a 30 day upcoming range, and then stick to the existing quarter.  I have found this nice for seeing what an upcoming quarter looks like, while maintaining the previous quarter within 2 months.  The 30 days is fully adjustable.

Year:
=IIF((DATEDIFF("d", Now(), DateAdd("d", 0, DateAdd("q", DateDiff("q", ("1/1/1900"), Today)+1, DateSerial(1900,1,1)))) < 30), (DatePart(DateInterval.Year, DateAdd("d", 0, DateAdd("q", DateDiff("q", ("1/1/1900"), Today), DateSerial(1900,1,1))))) , Year(DateAdd("m", -3, DateSerial(Year(Now), 3 * ((Month(Now()) - 1) \ 3 + 1) -2, 1))))
Quarter:
=IIF((DATEDIFF("d", Now(), DateAdd("d", 0, DateAdd("q", DateDiff("q", ("1/1/1900"), Today)+1, DateSerial(1900,1,1)))) < 30), (DatePart(DateInterval.Quarter, DateAdd("d", 0, DateAdd("q", DateDiff("q", ("1/1/1900"), Today), DateSerial(1900,1,1))))), ((Month(DateAdd("m", -3, DateSerial(Year(Now), 3 * ((Month(Now()) - 1) \ 3 + 1) -2, 1))) - 1)\3 + 1))


SharePoint Reporting Services Subscription Management using PS Scripting

One of the more tedious things to manage in SharePoint are the SQL Reporting Services reports.  Going through item by item to configure the data sources, parameters and shared schedule processing can take a bit of time.  Fortunately, there is a PowerShell option for doing some management of reports in SharePoint, although it is not very well documented.

Let’s say you have a batch of SSRS reports that you have just added new subscriptions for, and you want to clear out the old subscriptions.  Rather than go through each report individually, you can just run a bit of PS and remove all the old entries.

First hop on the SharePoint management shell, and then set up a web proxy to the reports server:

$websvc = New-WebServiceProxy -Uri "http://spreportssite-local.contoso.com/_vti_bin/ReportServer/ReportService2010.asmx" -Namespace SSRS.ReportingService2010 -UseDefaultCredential;

Next, pull the subscriptions for the site you want to manage:

$siteSubs = $websvc.ListSubscriptions("https://spreportssite.contoso.com/NYCOffice");

$siteSubs | select report, owner, status, lastexecuted, subscriptionid | format-table -auto

Then you will want to filter this down futher, to just get the subscriptions you want to remove:

$clearSubs = $siteSubs | select report, owner, status, lastexecuted, subscriptionid | where {$_.Status -ne "New Subscription"}

$clearSubs | select report, owner, status, lastexecuted, subscriptionid | format-table -auto

If the list looks good, then run the following to clear out all the old subscriptions:

foreach ($sub in $clearSubs) {$websvc.DeleteSubscription($sub.SubscriptionID)}

Add Modern Team Subsites to a SharePoint Online Site (SharePoint PnP)

Let’s say you want to create a batch of modern team sites, especially if you want to do this many times over for different locations, here is an easy script I put together which will accomplish it in a few moments.

$encpassword = convertto-securestring -String <password> -AsPlainText -Force
$cred = new-object -typename System.Management.Automation.PSCredential -argumentlist <logonid>, $encpassword

Connect-PnPOnline "https://contoso.sharepoint.com/corporate" -Credentials $cred

New-PnPWeb -Title "Accounting" -Url accounting -Template "STS#3"
New-PnPWeb -Title "Customer Service" -Url customerservice -Template "STS#3"
New-PnPWeb -Title "Executive" -Url executive -Template "STS#3"
New-PnPWeb -Title "Finance" -Url finance -Template "STS#3"
New-PnPWeb -Title "HR" -Url hr -Template "STS#3"
New-PnPWeb -Title "IT" -Url it -Template "STS#3"
New-PnPWeb -Title "Legal" -Url legal -Template "STS#3"
New-PnPWeb -Title "Shipping" -Url shipping -Template "STS#3"

//handle the navigation updates

//leave a link in place on the quick launch
ForEach ($item In Get-PnPNavigationNode) {if ($item.Title -notlike "<leavesomelink>*") { Remove-PnPNavigationNode -Identity $item.Id -Force}}

//add new subsites to the quick launch
$url = (get-pnpweb).serverrelativeurl + "/accounting"
Add-PnPNavigationNode -Location QuickLaunch -Title "Accounting" -Url $url
$url = (get-pnpweb).serverrelativeurl + "/customerservice"
Add-PnPNavigationNode -Location QuickLaunch -Title "Customer Service" -Url $url
$url = (get-pnpweb).serverrelativeurl + "/executiveteam"
Add-PnPNavigationNode -Location QuickLaunch -Title "Executive Team" -Url $url
$url = (get-pnpweb).serverrelativeurl + "/finance"
Add-PnPNavigationNode -Location QuickLaunch -Title "Finance" -Url $url
$url = (get-pnpweb).serverrelativeurl + "/hr"
Add-PnPNavigationNode -Location QuickLaunch -Title "HR" -Url $url
$url = (get-pnpweb).serverrelativeurl + "/it"
Add-PnPNavigationNode -Location QuickLaunch -Title "IT" -Url $url
$url = (get-pnpweb).serverrelativeurl + "/legal"
Add-PnPNavigationNode -Location QuickLaunch -Title "Legal" -Url $url
$url = (get-pnpweb).serverrelativeurl + "/shipping"
Add-PnPNavigationNode -Location QuickLaunch -Title "Shipping" -Url $url

 
The only downsides to this is that you still (may posssibly) need to go in and set up the permissions after the sites are created, as it will create them using inherited permissions.

Installing WordPress on “Azure App Service on Linux”

Realizing you may not want to have to manage an entire VM, a handy alternative is to use the new(ish) App Service on Linux feature that Azure has released.  This means you do not have to manage the entire server like you normally would, but can instead just put your bits on the app service and have it run.  Getting everything running is a bit cumbersome, and you will need to run a bunch of CLI commands, but it gets WordPress up and running.  Besides, isn’t the hardest part of using WordPress getting the environment set up anyway?

Notes before you start:

  • The following command is optional, if you want to put it into an existing resource group:
    New-AzureRmResourceGroup -Name <NameHere> -Location <DesiredRegionNameHere…ie. eastus>
  • (If you chose to create a new Resource Group, you will also need the Region ID for the region you wish to deploy to. https://azureprice.net/Region )
  • The template uses the chosen site name as the base name for the database name, server name, and hosting plan name (ie. mydatabase, mysqlserver, etc.).  If you would like this changed for standardizing the naming, you can change out the “variables” section of the azuredeploy.json, and put in what you need to.

Prerequisite: Have both Azure CLI and Azure RM for Powershell installed:

In Powershell (This will create the Resource Group, the MySQL server, the Linux plan, and the app.  Be sure to save the database admin and login info to KeyPass when you are prompted to create it):

Login-AzureRmAccount 

[Optional]

New-AzureRmResourceGroup -Name <NameHere> -Location <DesiredRegionNameHere...ie. eastus> 

[/Optional]

New-AzureRmResourceGroupDeployment -Name <NewNameHere> -ResourceGroupName <NewNameHere> -TemplateFile c:\azure\azuredeploy.json   

Use the .json file below for the above command, and place it somewhere you can run the PS against.  (this is borrowed from the official Azure Quick Start Templates: https://github.com/Azure/azure-quickstart-templates/tree/master/wordpress-app-service-linux) :

<<azure-app-linux.zip>>

Fill out the remaining prompts.

Now you need to create the database for hosting WordPress on the new server (You will need to find the Subscription GUID on portal.azure.com for the MySQL, or pull it from the results after “az login”):

az login 
az account set --subscription 00000000-0000-0000-0000-000000000000 
az mysql db create --name <DbNameHere, ie. "wordpress"> --resource-group <ResourceGroupNameHere> --server-name <MySQLServerNameHere, just the first subdomain name part, not namesitemysqlserver.mysql.database.azure.com> 

In the Azure Portal, SSH to the App, and run the following scripts:

cd /tmp 
curl -O https://wordpress.org/latest.tar.gz 
tar xzvf latest.tar.gz 
touch /tmp/wordpress/.htaccess 
chmod 660 /tmp/wordpress/.htaccess 

Then use VIM to edit the htaccess file:

(Use Shift+i to edit the file, then Esc, Shift+zz to save)

vim /tmp/wordpress/.htaccess

Add the following values to the htaccess file:

php_value max_input_vars 3000 
php_value max_execution_time 60 
php_value post_max_size 32M 
php_value upload_max_filesize 64M 

Save the file, and return to the command line.  Run the following scripts:

cp /tmp/wordpress/wp-config-sample.php /tmp/wordpress/wp-config.php 
mkdir /tmp/wordpress/wp-content/upgrade 
cp -a /tmp/wordpress/. /home/site/wwwroot 
rm /home/site/wwwroot/hostingstart.html 
find /home/site/wwwroot -type d -exec chmod g+s {} \; 
chmod g+w /home/site/wwwroot/wp-content 
chmod -R g+w /home/site/wwwroot/wp-content/themes 
chmod -R g+w /home/site/wwwroot/wp-content/plugins 
curl -s https://api.wordpress.org/secret-key/1.1/salt/ 

Copy the results, then add it to the wp-config.php file. Replace the following:

define('AUTH_KEY',         'put your unique phrase here'); 
define('SECURE_AUTH_KEY',  'put your unique phrase here'); 
define('LOGGED_IN_KEY',    'put your unique phrase here'); 
define('NONCE_KEY',        'put your unique phrase here'); 
define('AUTH_SALT',        'put your unique phrase here'); 
define('SECURE_AUTH_SALT', 'put your unique phrase here'); 
define('LOGGED_IN_SALT',   'put your unique phrase here'); 
define('NONCE_SALT',       'put your unique phrase here'); 
vim /home/site/wwwroot/wp-config.php 

Also update DB connection details in wp-config.php with Azure MySQL DB:

DB_NAME: <wordpressDbName> 
DB_USER: <dbadmin>@<name>sitemysqlserver 
DB_PASSWORD: <dbadminpw> 
DB_HOST: <name>sitemysqlserver.mysql.database.azure.com 

Navigate to http://<name>site.azurewebsites.net and complete the setup


Display Metadata Tags in SharePoint Search Core Results

SharePoint 2010 and onwards has the excellent feature of being able to tag content with customizable metadata.  This great for using the refining options that are built into the framework.  For whatever reason however, Microsoft does not display this metadata in the actual results, so if you want too refine the search results by tag/metadata, it is really just a matter of guesswork.

Fortunately, there is a solution that is pretty easy to plug in which resolves this problem, provided you do not mind getting your hands dirty with a little XSL / XSLT.

The first thing you are going to need to do is identify the “Mapped To Property” that you want to display results for in the search results.  This will begin with “ows_taxId_” in the “Search Schema” section for your Search Application (in Central Admin).

My metadata is just called “Tags”, so the “Mapped to Property” is “owstaxidtags”.  The critical piece is that you remember this.

Next up, navigate to your search results page you want to show the tags on.  Click the “Page” tab, and then edit the page. Scroll down to the “Search Core Results” web part, and click “Edit Web Part”.

From here, there are two text areas you are going to need to edit.  I STRONGLY RECOMMEND MAKING A BACKUP OF EACH OF THESE BEFORE YOU START EDITING.  Open the “Display Properties”.

The first thing you will do is add a reference to the property for the “Fetched Properties”.  To do so add the following before “</Columns>”

<Column Name="owstaxidtags"/>

Next, you will need to update the XSL for the search core results.  Click the button that says “XSL Editor…”  Copy this text and paste it into a more user friendly editor like Notepad++

There area few areas you will need to make edits for.  First is to set up a parameter for the property.  Find the area at the beginning where there are a bunch of “param name” declarations, and add one for your property:

<xsl:param name="IsSearchServer" />
<xsl:param name="Period" />
<xsl:param name="SearchHelp" />
<xsl:param name="owstaxidtags" /> 
<xsl:param name="Date" />
<xsl:param name="Size" />
<xsl:param name="ViewInBrowser" />

Next, scroll down until you find the “<xsl:template match=”Result”>” area.  Add a local variable for your property:

<xsl:variable name="id" select="id"/>
<xsl:variable name="currentId" select="concat($IdPrefix,$id)"/>
<xsl:variable name="url" select="url"/>
<xsl:variable name="owstaxidtags" select="$owstaxidtags"/>

Next you need to find the area you want to output the tags.  For my purposes, I am going to put it in “<div class=”srch-Metadata2″>”.  You can use the developer tools in your browser to locate the div name that you want to render the text to.

So right underneath the “DisplayDate”, I am going to just make the metadata tags an extra piece of content to display.  Here I am adding two things.  First the label, if it sees that there are any tags, and the second is a reference to the display template, which formats the metadata tags:

<div class="srch-Metadata2">

    <xsl:call-template name="DisplayDate">
        <xsl:with-param name="write" select="write" />
    </xsl:call-template> 

    <xsl:if test="string-length(owstaxidtags) &gt; 0"> 
        <xsl:text> Tags: </xsl:text>
    </xsl:if> 
    <xsl:call-template name="FormatMetadata">
        <xsl:with-param name="owstaxidtags" select="owstaxidtags" />
    </xsl:call-template> 

Then all that is left of the XSL is to add in the display template.  Your mileage may vary on this.  Depending on how SharePoint outputs your tags, you may need to modify these if statements until you get the desired formatting.  Scroll down until you get the area with the other display templates (example: <xsl:template name=”DisplayDate”>)


Then add in the display template:

<xsl:template name="FormatMetadata">
    <xsl:param name="owstaxidtags"/>
    <xsl:if test="string-length($owstaxidtags) > 0">
         <xsl:variable name="nextItem" select= "substring-before(concat($owstaxidtags, '|'), '|')"/>
         <xsl:variable name="remaining" select= "substring-after(concat($owstaxidtags, '|'), '|')"/>
         <xsl:if test="(not(contains($nextItem, '#'))) and (contains($nextItem, ';'))">
             <xsl:variable name="validItem" select= "substring-before(concat($nextItem, ';'), ';')"/>
             <xsl:value-of select="$validItem"/>
             <xsl:if test="contains($remaining, ';')">
                 <xsl:text>, </xsl:text>
             </xsl:if>
        </xsl:if>
        <xsl:if test="(not(contains($nextItem, '#'))) and (not(contains($nextItem, 'GP0'))) and (not(contains($nextItem, ';')))">
            <xsl:value-of select="$nextItem"/>
        </xsl:if> 
        <xsl:call-template name="FormatMetadata">
            <xsl:with-param name="owstaxidtags" select="substring-after($owstaxidtags, '|')"/>
        </xsl:call-template>
    </xsl:if>
</xsl:template>


Once you have made all your edits (be sure to keep that backup handy), paste the new edited XSL changes into the “XSL Editor” for the web part, and click “OK”.  If you get an error, recheck your steps.  If you are not seeing what you expect, you can always output just the raw metadata tag info without using the template by calling it directly in your template:

<xsl:value-of select="$owstaxidtags" />

So that’s it! You should now be seeing your metadata tags in your search results.

Locking Down Search for a Site (Part 2 – SP2013, SP2016, SP2019)

If you want to achieve the functionality I outlined in “Part 1” using SharePoint 2013 UI, or higher (SP 2016, 2019), you are going to need to go through a different process, as Microsoft deprecated Search Scopes in the 2013 UI.  Fortunately, the work around is actually a bit less work, as you only need to modify your search results page.

The first step is to create a new results page.  This can be done by navigating to the “Pages” area of your search site. (ie. click the gear icon, and then “Site Contents”).  From there, click the Documents drop down, and choose a new “Welcome Page”.

It should default to a “Search Results” page template, but if it does not, be sure you choose that type.  Give it a title relating to the search you want to have the page limited to.

Once you have the page created, click “Edit” from the toolbar, and scroll down to the search results area.  Choose “Edit Web Part” from the Search Results web part.

From there, click the “Change Query” button from the web part editor’s “Properties for Search Results” section.

Here is where you are going to restrict the results for the page. Under the “Basics” tab, you will have several property filters to choose from.  If you do not see the one you want, you can load all the properties by clicking the “Show all managed properties” option at the bottom.  For this example, I want to restrict the results to a particular site, so I chose the “Site” property, and then filled in the URL for the site.  You can use the “Test Query” button to confirm there are results coming through, provided your site already has some content.

Click OK to save the updated settings.


Next you will likely want to do some tidying up, and possibly even include a new tab for your new search results page.

Choose “Edit Web Part” for the Search Box further up at the top of the page, and click the checkbox for “Use this site’s Search Settings”.

Also click the link where it is hyperlinked to “Search Settings”.  This is where you can add a new tab to the search navigation for the page.  Give it a title, and then put in the link to the custom results page you just created.   Click OK for the Search Settings, and also OK for the Search Box settings.

Save and publish the page.  Run a few queries to make sure you didn’t miss anything.

That’s it! You are done.

You can also reference search boxes on your other sites to use this custom results page.  Just point them there.


Locking Down Search for a Site (Part 1 – SP2010, SP2013*)

One of the SharePoint features that does not always work as expected is the “Search This Site” component.  If one is doing a search using this option, the results page can sometimes get confusing very quickly for unexperienced SharePoint users.  Results are typically presented for the site in question, however the user is then presented with too many options for making ongoing searches.  What is worse, is that if the user alters their search, they may lose the context of searching just that one site, and in turn get results for the entire enterprise instead.

Fortunately, SharePoint has some quite simple options for remedying this.  For SharePoint 2010 & 2013 (in the 2010 UI), there is the Search Scopes option, and in 2013 (UI) onwards there is an option for the customization of the results page, which I will be documenting in a follow-up post to this one.

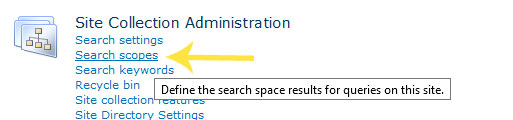
The first step is it to set up a new scope for the site you wish to limit the results to.  To do so, navigate to the root of the site collection, and click “Site Actions”, then “Site Settings”.  Find the link labeled “Search Scopes”.

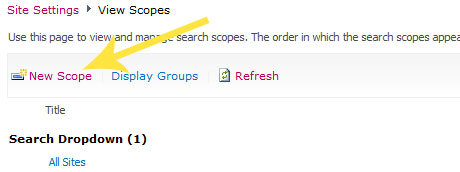
Once on the Scopes page, click the “New Scope” link.

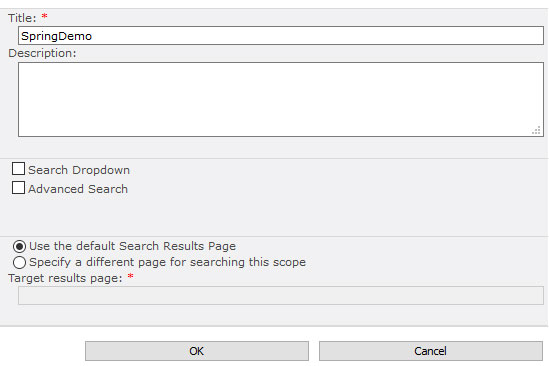
Give the new scope a title.  Preferably something short, and with no spaces.  The reason for this is you will need to use this exact title later on.  Unless you need the other options changed for some reason, you can feel free to leave them as is.  The scope will still be available for use, even if the check boxes are not selected.

The next step is to set up some rules for the scope you just created, which will tell the scope which content it should hold.  Look through the scopes on the View Scopes page, until you locate the scope you just created.  Click the “Add Rules” link (you can also click “Edit Properties and Rules” from the drop down if you are going back to change or add more rules).

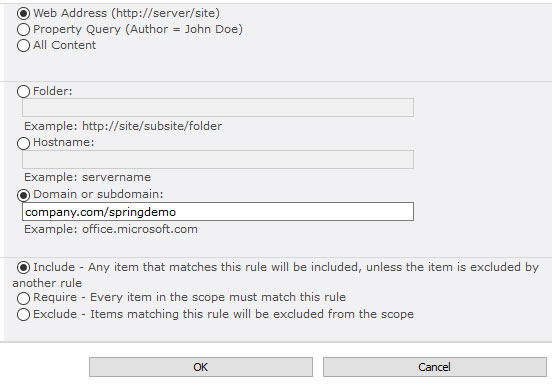
From here, you will want to set the scope to be just to the site.  Set the URL to the domain, and click OK.

From here, you will want to set up the search results page that you want to use for the site where you will have the limited results.  You have a couple of options here for placement.  You can either add the results page to the root search site, or create a new Search Center and add it as a subsite under the site you are working on.  The reason you may want to set up a new Search Center is for when you want to maintain the same branding presence as the site you are providing results for.

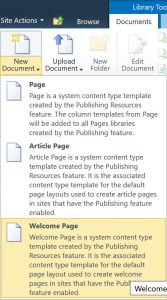
You will want to create a new “results page” in the “Pages” area of the search site. For example, you could add the page to https://company.com/search/Pages/Forms/AllItems.aspx  (Click the “Documents” tab, Click the New Documents drop down, and select “Welcome Page”, then “Search Results Page”)

If using a new search center as a subsite (Site Actions -> Site Settings -> Sites and Workspaces -> Create -> Under the Enterprise tab choose Enterprise Search Center), you could just modify the existing results page: https://company.com/SpringDemo/search/Pages/results.aspx

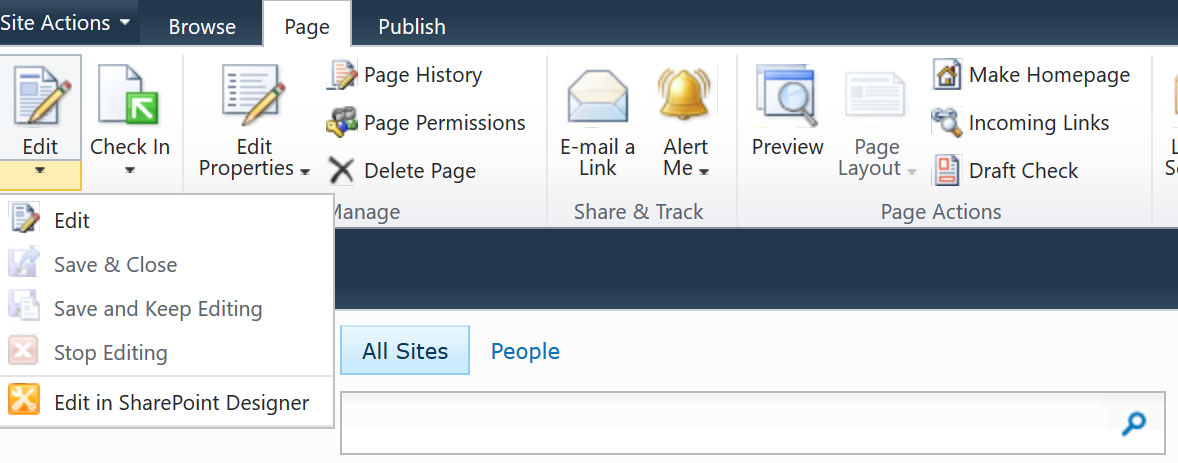
Once on the results page, click the “Page” tab, and then “Edit”


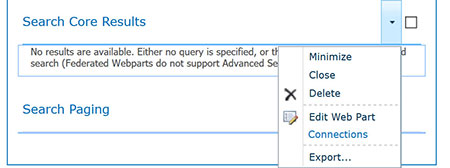
Now you are ready to plug in the custom scope you created in the prior step.  Scroll down to the Search Core Results web part, and click the “Edit Web Part” option from the drop down.

In the settings area, expand the “Location Properties”, and in the textbox labeled “Scope”, add in the scope name of the scope you created earlier.

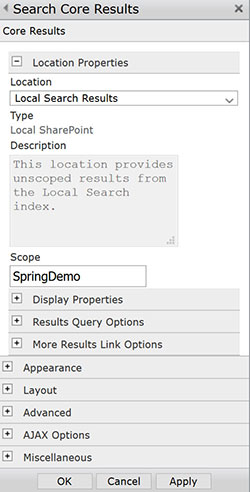
Click OK, and then check in and publish the updated results page.

The last step is to wire up a search box to the updated results page.

For this example, we will be wiring up a search box on the home page of the site.

The first thing you may want to do is hide the search bar in the masterpage.

The reason for this is that this search bar is not directly customizable.  The only way around that is to use some custom JavaScript to override the default search destination.  If you are using the default SharePoint masterpage, you can hide it by using a bit of custom CSS ( #s4-searcharea {display:none} ).  You can put that in a .css file, and if you have publishing turned on, add it as a css file to be used for the site.

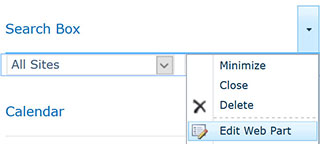
After completing that optional step, you are finally ready to complete the final step.  Add a “Search Box” web part to where you would like it placed. Then choose “Edit Web Part”

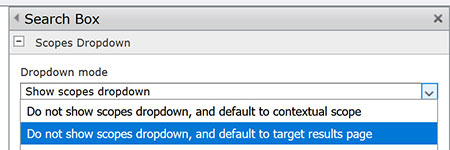
If you want to keep searches limited to just this site, first hide the scopes drop down (default to target results page).

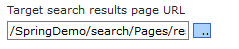
Under the Miscellaneous section, add put in the link to the results page you modified earlier (ie. /SpringDemo/search/Pages/results.aspx)

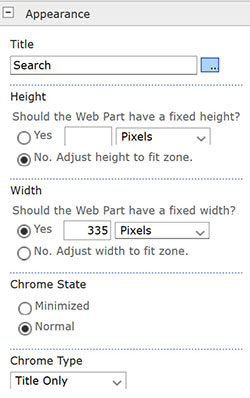
Last you will want to change the chrome type and title so that people will know what it is for.

Click OK, and stop editing (publish if necessary) the page.  You should be ready to test/go now.


As a last optional step, if you want to put a link on the search results page so that the user can get easily back to the home page, you do that by adding a content editor web part to add a link.

SharePoint Migration Tool Error – 0x01710009

When using the SharePoint Migration Tool to move to 365, you may encounter some cryptic errors in the tool’s error reports, such as the following:

(In this example I was trying to move a discussion board from SP 2013 on-prem)


Source Destination Item name Extension Item size Content type Status Result category Message Error code 
https://sp.contoso.com/Lists/Discussions/TestThread https://contoso.sharepoint.com/Lists/Discussions/TestThread TestThread 0 Folder Failed SERVER FAILURE Errors or timeout for Server Processing the file:Not all the items in the package have been migrated 0x01710009…………
https://sp.contoso.com/Lists/Discussions/TestThread/2_.000 https://contoso.sharepoint.com/Lists/Discussions/TestThread/2_.000 2_.000 0 0 Item Failed SERVER FAILURE Errors or timeout for Server Processing the file:Not all the items in the package have been migrated 0x01710009………………


In my case, the solution was to look into the “Details” folder of the Migration Tool report, and look at the UserNotMapped_R1.csv file.  This contained a list of SIDs for users for our on-prem installation, that while their accounts where in SharePoint, they did not exist in our AD.  Basically the Migration Tool errors out when it encounters a problem mapping an account to 365 SharePoint.

The solution was to look them up from the on-prem installation, and then delete them:

PS C:\Users\SPFarm> $u = Get-SPUser -Web https://sp.contoso.com -Limit ALL |where {$_.Sid -eq "s-1-5....."}
PS C:\Users\SPFarm> $u

UserLogin DisplayName
--------- -----------
CONTOSO\jdoe1  John Doe

Then, once the user account was known, visit https://sp.contoso.com/_catalogs/users and create a custom view to filter on the “UserLogin” listed above, with an option to Edit.  If you click on the “Edit” next to their account, you will have an option to delete them from the site collection.  I did this for all the SIDs provided in the file, and it resolved the issue.


Disable Install Silverlight Prompt in SharePoint 2013

If you have users that are still using IE to visit your SharePoint 2013 sites, they may encounter an IE message telling them they should install the latest version of Silverlight (which is quite dead). All this is really used for is the gallery for installing new apps/webparts. This can easily be disabled by running a bit of PowerShell (by disabling this, users will still get the fallback functionality as you would in Chrome, etc.)

$webapp = Get-SPWebApplication http://sitename
//check to see if the Silverlight prompt is enabled
$webapp.allowsilverlightprompt
//if it returns as true, then set it to false and update
$webapp.AllowSilverlightPrompt = $false
$webapp.Update()

Remove a SharePoint Search Server from the Search Service Application

Occasionally there will be instances where you need to remove a server from the Search Service Application, if you have multiple search servers set up in the farm. To do so, especially if the server is unavailable, or offline, follow the steps below:

$ssa = Get-SPEnterpriseSearchServiceApplication
$active = Get-SPEnterpriseSearchTopology -SearchApplication $ssa -Active
$clone = New-SPEnterpriseSearchTopology -SearchApplication $ssa -Clone -SearchTopology $active
$clone.GetComponents()

//use the output from above to grab the names of each component from the server you wish to remove.  remove each component as necessary.
Remove-SPEnterpriseSearchComponent -SearchTopology $clone -Identity ($clone.GetComponents() | Where-Object {$_.Name -eq "ContentProcessingComponent3"}) -Confirm:$false

//check the new components topology
$clone.GetComponents()

//set the topology
Set-SPEnterpriseSearchTopology -Identity $clone