AppFabricCachingService – Service Status: Unknown

I ran into a bit of an issue where one of our SharePoint 2013 farm servers was acting unusual when it came to the AppFabricCachingService. When logging in, we were getting some errors, which showed up in the logs as being related to the cache.  If you are having similar issues, you may want to try some of the following steps:

Starting the Distributed Cache Service

First, verify that it is showing as “Started” in Central Admin on the offending server under “Services on Server”.  If you are having trouble starting it, as I have occasionally experienced in Central Admin, try manually starting “AppFabric Caching Service” under “Administrative Tools”,  “Services.”  Then run :

$instanceName =”SPDistributedCacheService Name=AppFabricCachingService”
$serviceInstance = Get-SPServiceInstance | ? {($_.service.tostring()) -eq $instanceName -and ($_.server.name) -eq $env:computername}
$serviceInstance.Unprovision()
Then:
$instanceName =”SPDistributedCacheService Name=AppFabricCachingService”
$serviceInstance = Get-SPServiceInstance | ? {($_.service.tostring()) -eq $instanceName -and ($_.server.name) -eq $env:computername}
$serviceInstance.Provision()
You may need to reboot occasionally during this process of trying to get things back in working order.

Server Status: Unknown

The issue I ran into was when running “Get-CacheHost”, it a returned status of “Unknown” for one of the servers.

As first course, reprovisioning the service is a good start. I verified that the service was indeed running on the server in Central Admin, and the ran the following PowerShell on the troublesome server:

Remove-SPDistributedCacheServiceInstance

$instanceName ="SPDistributedCacheService Name=AppFabricCachingService"

$serviceInstance = Get-SPServiceInstance | ? {($_.service.tostring())
-eq $instanceName -and ($_.server.name) -eq $env:computername}

$serviceInstance.delete()

Add-SPDistributedCacheServiceInstance

Use-CacheCluster

Get-CacheHost

If you run this on the local server, and it is still showing as “Unknown” when running “Get-CacheHost”, you may need to run:

Start-CacheHost

It will prompt you to enter the name of your server, and the port.  After this, check your work by running Get-CacheHost again.

Running this indicated that all the services were “UP” across our servers, but this was when running Get-CacheHost on the troublesome server. When running Get-CacheHost on the other servers, we still got indications of status “Unknown”.

Check the Firewall Settings

This left me to think that perhaps the problem was not related to the service itself. Sure enough, when attempting to ping the troublesome server from one of the other servers, I received a “Request timed out” message.

I went into Windows Firewall and changed the settings to match the incoming settings of those on the other servers that were not having an issue. I attempted to reprovision the service again after that, and it began to work.

Restart Windows Time to Ensure Servers are in Sync

Another problem I discovered that can occur in situations like this is if the time on the servers gets out of sync.  This can also cause issues with the cache.  What you will want to do in this scenario is navigate to “Services” on the offending server, and restart “Windows Time.”

Change the CacheCluster Size

Another useful setting I found was to make all the hosts have the same size cache.  If you find one of them is not set to the same size as the other run (changing the CacheSize accordingly):

Stop-CacheCluster
Set-CacheHostConfig -CacheSize 1000 -HostName server1 -CachePort 22233

Specified host is not present in cluster

If you receive “Specified host is not present in cluster” when attempting to get the service up and running, you may want to run the following scripts:

First, check to see if it returns a correct entry.

Get-CacheHostConfig –ComputerName server1.contoso.com -CachePort 22233

That will give you the details for the servers cluster information, which should look like:

HostName        : server1.contoso.com
ClusterPort     : 22234
CachePort       : 22233
ArbitrationPort : 22235
ReplicationPort : 22236
Size            : 1229 MB
ServiceName     : AppFabricCachingService
HighWatermark   : 99%
LowWatermark    : 90%
IsLeadHost      : True

If it does not, and you get an error of “Specified host is not present in cluster.” Then try the following script:

Register-CacheHost –Provider [provider] –ConnectionString [connectionString]
-Account "NT AuthorityNetwork Service" -CachePort 22233 -ClusterPort 22234 -ArbitrationPort 22235
-ReplicationPort 22236 –HostName [serverName]

For “provider” and “connectionString” check the DistributedCacheService.exe.config , under “C:\Program Files\AppFabric 1.1 for Windows Server”, which will look like:

<clusterConfig provider=”SPDistributedCacheClusterProvider” connectionString=”Data Source=sql.contoso.com;Initial Catalog=SharePoint_Config;Integrated Security=True;Enlist=False” />

Restart Cache Cluster

Finally, if you are still experiencing issues getting the server to start, you may want to try restarting the Cache Cluster:

Restart-CacheCluster

Finally, if you are still having issues, I would heartily recommend this post, as it is the most useful one I have run across:  http://mmman.itgroove.net/2013/07/fixing-the-appfabric-cache-cluster-in-sharepoint-2013/

Here is a useful video for getting oriented with the cache service:

Upgrade SharePoint 2010 My Sites to SharePoint 2013

There seems to be a lack of information out there regarding upgrading SharePoint 2010 My Sites to SharePoint 2013.

If you try to do a straight “Mount-SPContentDatabase” to a new web application.  This will work partially, as you will be able to get to your “My Site”, however, when trying to go into “Site Settings” or “Site Permissions”, you will get a “404 – File Not Found” for a lot of the back-end system files.

The best way I have found is to set up the My Site Host first in SharePoint 2013, and then run a Mount-SPContentDatabase on your old SharePoint 2010 My Sites database.

1. Backup your WSS_Content_UserSites

2. Restore it to your SharePoint 2013 SQL as a new database

3. In Central Admin, go to “Application Management”, “Manage Web Applications”, choose “New”

4. Once the site is created, choose to “Create a new site collection”, and select the “Enterprise” tab, and “My Site Host” as the type.

5. Once the My Site Host is created, you can attach your 2010 My Sites database:

Mount-SPContentDatabase -Name WSS_Content_UserSites -WebApplication https://mysites.contoso.com

6. Finally, go into your User Profile Service (Application Management -> Manage Service Applications -> User Profile Service).  Click on “Setup My Sites”

7. Enter your My Site Host in the area provided, and don’t forget to add the appropriate groups to “Read Permission Level”

Restoring Local (Farm / Self-Signed) Certificate in SharePoint 2013

If you accidentally delete or overwrite your “local” SharePoint certificate, you may find random things breaking such as Visio or Excel web parts, or things that require authentication.

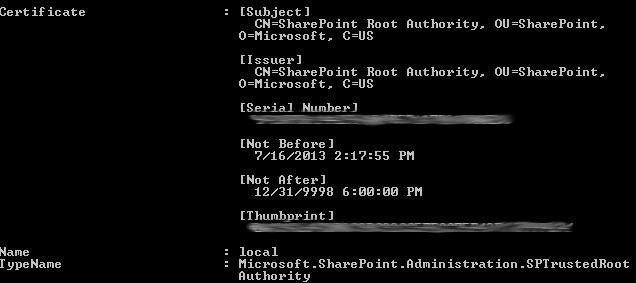
You can check to see what certificate you have installed, and see if this might be the case by typing the following in Powershell:

Get-SPTrustedRootAuthority

Examine the “local” entry. If it does not say “SharePoint Root Authority” for the certificate, you will need to fix this. It should look something like this if it is correct:

If your cert does not look like the one above, and you have a multi-server farm, you should still be in luck. Log on to one of the other servers, and fire up SharePoint Management Shell.

Type the following:

$localCert = (Get-SPCertificateAuthority).RootCertificate
$localCert.Export("Cert") | Set-Content "C:\localCert.cer" -Encoding byte
Log on to the machine with the incorrect certificate (likely your Central Admin server), and copy the exported certificate there.  Again in PS:
Get-SPTrustedRootAuthority

Find the “Id” for the “local” certificate.
Import the certificate.
$localCert = New-Object System.Security.Cryptography.X509Certificates.X509Certificate2("c:\localCert.cer")

Using the Id you noted above for the “Identity”:
Set-SPTrustedRootAuthority -Identity "3e20f374-6d2e-4115-bbb8-40d9dd803d5d" -Certificate $localCert

Finally, check your work:
Get-SPTrustedRootAuthority

This should put you back in business.

Renewing ADFS 2.0 Certificates in SharePoint 2013

First export your certificate(s) from ADFS.

Log in to AD FS 2.0 Management.  Under “Service”, select “Certificates.”  Find the primary token-signing certificate (the new one you want to renew).  Double click on it, under “Details”, click the “Copy To File” button.  Follow the steps to export it (Choose not to export the private key).  If the certificate has a parent, you may also need to double click on the certificate you are exporting, and export the parent as well.

Copy the certificate(s) to your SharePoint 2013 Server.

From the SharePoint 2013 Management Shell:

Type:

Get-SPTrustedRootAuthority

Find the “Id” for the Trusted Root Authority (certificate you want to update):

Be sure you are selecting the correct Id, and not the Id for the “local” self signed SharePoint certificate.

Next, import the certificate:

$cert = New-Object System.Security.Cryptography.X509Certificates.X509Certificate2("c:\newcert\adfs-new.cer")

Then, update the TrustedRootAuthority certificate using the Id you noted above for the “Identity”:

Set-SPTrustedRootAuthority -Identity "da3a4018-993b-4fac-9c31-7ba86ae03114" -Certificate $cert

(You may need to repeat the above steps for the parent cert, if you are updating that as well.)

Check your work, by typing:

Get-SPTrustedRootAuthority

Note the dates for your cert(s) to see if it is current.

Finally, you will also need to update the Trusted Token Issuer.

Type:

Get-SPTrustedIdentityTokenIssuer

Note the name for your trusted token issuer.

Using the Name noted above, update the certificate using the following:

Set-SPTrustedIdentityTokenIssuer "adfs20" -ImportTrustCertificate $cert

Finally, verify your work:

Get-SPTrustedIdentityTokenIssuer

Try logging in.  If all goes well, you’ve earned yourself a coffee.

Setting Up Apps Service (ADFS 2.0 capable) & Where To Install Apps Certificate (*.apps.domain.com)

There seems to be sparse information on how to set up the Apps Service for SharePoint2013 using SSL, especially, if you decide not to set up a separate domain, but rather use a subdomain with a unique SSL cert (*.apps.domain.com).   Most of the setup is fairly straightforward, however, there are a few differences.

First, I do want to note that Microsoft does not recommend this model (http://technet.microsoft.com/en-us/library/fp161237.aspx).  We are doing this because we are using ADFS 2.0 and will be using Apps developed in-house.

Use a unique domain name, not a subdomain
For security reasons, the domain name that you choose should not be a subdomain of the root domain name that hosts other applications. This is because other applications that run under that host name might contain sensitive information that is stored in cookies that might not be protected. Code can set or read cookies across different domains that are under the same domain. A malicious developer could use code in an app for SharePoint to set or read information in a cookie on the root domain from the app for SharePoint subdomain. If a malicious app accessed that cookie information, then you could have an information leak. Internet Explorer honors the settings that SharePoint sites use to protect against this issue. However, you should still use a domain for apps that is separate from your other domains. For example, if the SharePoint sites are at Contoso.com, do not use Apps.Contoso.com. Instead use a unique name such as Contoso-Apps.com. This is not to say that you should never use a subdomain if you have business reasons to do this. However, consider all potential security risks.

This from Microsoft regarding ADFS and SharePoint Apps:

(post) SharePoint-hosted Apps do not support SAML auth – currently SharePoint-hosted Apps will not be redirected to correctly when using SAML auth.  This is because most identity providers (ADFS 2.0 included), do not support wildcards for return URLs – which would be needed due to the isolated domain model implemented for SharePoint-hosted Apps.  However, Azure hosted, or provider-hosted Apps will work when SharePoint is configured to use SAML auth – but there is some configuration required, which Steve Peschka covers off in quite some detail here:  Using SharePoint Apps with SAML and FBA Sites in SharePoint 2013.

With that said, the setup is as follows (in Powershell):

$subService = New-SPSubscriptionSettingsServiceApplication -ApplicationPool “Default SharePoint Service Application Pool” -Name “Subscription Settings Service” -DatabaseName “Subscription_Settings_Service_DB”

New-SPSubscriptionSettingsServiceApplicationProxy -ServiceApplication $subService

Get-SPServiceInstance | where {$_.TypeName -eq “Microsoft SharePoint Foundation Subscription Settings Service”} | Start-SPServiceInstance

Then go into DNS and set up your subdomain for “apps.domain.com” then add a CNAME entry for * to point back to the SharePoint server that has the apps service running.

Head over to Central Admin, go into “Manage Service Applications,” click “New”, select “App Management Service.”

Create a new App Management Service Application, being sure to clear out that nasty Guid and also selecting your default service app pool.

Next go to “Services on Server” and start the “App Management Service.”

You are almost done.  Then click on “Apps” in the left menu (second link from the bottom). Click “Configure App URLs.” Enter “apps.domain.com” and enter an App prefix “app.”

Last step is where the process deviates a bit. You will need to set up a web application without a host header listening on port 443.  This is so that SharePoint can listen for requests that are specific to the apps. Be sure to select “Use Secure Sockets Layer (SSL), and assign it to port 443.

Finally, last step is to install your certificate for “*.apps.domain.com”  I am assuming here you already have gotten one.

  1. Go into IIS Manager.
  2. Find the SharePoint – Apps site you just created.
  3. Click on it, click “Bindings…”
  4. Select the entry with port 443
  5. Click “Edit”
  6. Select the *apps.domain.com certificate
  7. Click OK

That’s it. You should be good to go now!

*I will add a caveat here that I have not built any apps yet, so I have yet to test this all the way through, but this post is based on all the materials I could find, and from what I can tell, it should work.

ID4270: The ‘AuthenticationInstant’ used to create a ‘SAML11’ AuthenticationStatement cannot be null.

During our upgrade to SharePoint 2013 we ran into an issue related to ADFS.  For some reason, SharePoint did not like the SAML coming out of our production ADFS server.  The first cryptic error showed a message indicating:

The server was unable to process the request due to an internal error. For more information about the error, either turn on IncludeExceptionDetailInFaults (either from ServiceBehaviorAttribute or from the <serviceDebug> configuration behavior) on the server in order to send the exception information back to the client…

Figuring out where to go next required modifying:  C:\Program Files\Common Files\microsoft shared\Web Server Extensions\15\WebServices\SecurityToken\web.config, and adding a line to output the debug information.

<behaviors>
<serviceBehaviors>
<behavior name=”SecurityTokenServiceBehavior” >
<!– The serviceMetadata behavior allows one to enable metadata (endpoints, bindings, services) publishing.
This configuration enables publishing of such data over HTTP GET.
This does not include metadata about the STS itself such as Claim Types, Keys and other elements to establish a trust.
–>
<serviceMetadata httpGetEnabled=”true” />
<serviceDebug httpHelpPageEnabled=”true” includeExceptionDetailInFaults=”true” />
<!– Default WCF throttling limits are too low –>
<serviceThrottling maxConcurrentCalls=”65536″ maxConcurrentSessions=”65536″ maxConcurrentInstances=”65536″ />
</behavior>
<behavior name=”ApplicationSecurityTokenServiceBehavior” >
<serviceMetadata httpGetEnabled=”false” httpsGetEnabled=”false” />
<serviceThrottling maxConcurrentCalls=”65536″ maxConcurrentSessions=”65536″ maxConcurrentInstances=”65536″ />
</behavior>
</serviceBehaviors>
</behaviors>

Then, trying to log in again via ADFS, the following message was displayed.

System.ServiceModel.FaultException`1[[System.ServiceModel.ExceptionDetail, System.ServiceModel, Version=3.0.0.0, Culture=neutral, PublicKeyToken=b77a5c561934e089]]: ID4270: The ‘AuthenticationInstant’ used to create a ‘SAML11’ AuthenticationStatement cannot be null.

Firing up Fiddler, and using this article: http://social.technet.microsoft.com/wiki/contents/articles/3286.ad-fs-2-0-how-to-use-fiddler-web-debugger-to-analyze-a-ws-federation-passive-sign-in.aspx, I took at look at the SAML being returned.  Sure enough, the AuthenticationStatement looked just fine, and practically identical to the SAML coming back from our working test instance of ADFS.  Great…where to go from here?

The answer was to add the AuthenticationInstant as a claim in ADFS.

Finally, the last step was to add a mapping to our TrustedIdentityTokenIssuer:

$ti = Get-SPTrustedIdentityTokenIssuer adfs20

$ti.ClaimTypes.Add(“http://schemas.microsoft.com/ws/2008/06/identity/claims/authenticationinstant”)

$ti.Update()

$mapNew = New-SPClaimTypeMapping –IncomingClaimType “http://schemas.microsoft.com/ws/2008/06/identity/claims/authenticationinstant” -IncomingClaimTypeDisplayName “AuthenticationInstant” –SameAsIncoming

Add-SPClaimTypeMapping –Identity $mapNew –TrustedIdentityTokenIssuer $ti

Then, one last login.  Boom! Success!

Unable To Set “Claim Provider Identifier” with Active Directory Import

As I was trying to get the User Profile Service up and running with our ADFS implementation, I ran into a bit of a snag trying to set up the Profile Synchronization using the “SharePoint Active Directory Import”.

After setting the sync to “Use SharePoint Active Directory Import” in the “Configure Synchronization Settings”, and then, going into “Configure Synchronization Connections” an setting up a new connection, you will notice that all mapped properties are cleared out under “Manage User Properties.” Unfortunately, none of the properties are available for selection, so they need to be entered manually.

The snag I ran into was related specifically to the Claim mappings. I was able to enter the “Claim User Identifier” without issue, however, when attempting to enter the “Claim Provider Identifier”, it would not let me add it, as the “Add” button was greyed out. After fumbling around for a bit and trying a page refresh, I realized that it would not let me add a new value, because it had kept a previous empty value. Clicking the “Remove” button, allowed me to enter in a new value for the “Claim Provider Identifier” and save it. A fairly straightforward solution, but not completely obvious.

SharePoint Designer and the Infernal Checkmark

Probably my biggest pet peeve with SharePoint Designer, other than the occasional lock up and crash, is that frequently it will show files as being checked out when they are actually not.  This is particularily annoying, because you will have to pull up the site in a browser and check it out from there to do any edits on the file.   I still have not figured out a good reason for this, other than that the “value” for this appears to come from the user cache, rather than from the server.  Kind of a poor implementation in my opinion.  Regardless, at least it is fairly easy to resolve.  Just browse to (from Windows 7):

C:\Users\YourUserName\AppData\Local\Microsoft\WebsiteCache

Then find the site that is giving you grief and delete the associated files.  SharePoint Designer will rebuild them next time you pull up the site.

Force SharePoint to Download Documents In IE

Despite deactivating the Office integration, you may still have documents that try to open in the browser.

To work around this, add a bit of script to your site:

jQuery("a[onclick*='SharePoint.OpenDocuments']").each(function (data) {
    var h = this.href;
    if (h.indexOf('http') >= 0) {
        var p = h.indexOf('/', h.indexOf('/') + 1);
        h = h.substring(p, h.length);
        p = h.indexOf('/', h.indexOf('/') + 1);
        h = h.substring(p, h.length);
    }
    this.href = '/_layouts/download.aspx?SourceURL=' + h;
    jQuery(this).removeAttr('onclick');
});

Display Page Content Based On Permissions Instead of Groups

There are instances where you want to keep certain portions of your masterpage hidden from certain types of users.  For instance, you may not want all of your users to see the “My Site” link.   Add the following wrapper to whatever you wish to trim permissions for.  Below is a list of all the different permission types.  Just plug in the values into the PermissionsString for the ones you want.

<SharePoint:SPSecurityTrimmedControl PermissionsString=AddAndCustomizePages, ManageLists runat=server>
<%– some content here … %>
</SharePoint:SPSecurityTrimmedControl>

Other Variables:

List Permissions
ManageLists
CancelCheckout
AddListItems
EditListItems
DeleteListItems
ViewListItems
ApproveItems
OpenItems
ViewVersions
DeleteVersions
CreateAlerts
ViewFormPages

Site Permissions
ManagePermissions
ViewUsageData
ManageSubwebs
ManageWeb
AddAndCustomizePages
ApplyThemeAndBorder
ApplyStyleSheets
CreateGroups
BrowseDirectories
CreateSSCSite
ViewPages
EnumeratePermissions
BrowseUserInfo
ManageAlerts
UseRemoteAPIs
UseClientIntegration
Open
EditMyUserInfo

Personal Permissions
ManagePersonalViews
AddDelPrivateWebParts
UpdatePersonalWebParts