Errors When Adding SP2013 Navigation in SP2010 UI Mode

There is an rather obscure error that can occur when working with “Audiences” and groups in SharePoint 2010 mode within SharePoint 2013. The problem can surface when trying to create list items based around audiences. Items can be created just fine, but when trying to add an audience trimming to the item, SharePoint can throw an error. This is related to how the form within IE is storing the HTML for the audience.

To get around this, you will need to change your Compatibility View setting within IE.

See example:

Add A Link:

click-add-link

Create a link and give it an audience trimming:

adding-a-sharepoint-link

SharePoint Throws An Error:

error-adding-navigation

Navigate to Compatibility Setttings:

go-to-compatibility

Change Compatibility Settings to use Compatibility View:

change-compatibility-for-sh

Navigational items should now save successfully.

Log In as different user (SP2013)

SharePoint 2013 took away the ability to log in as a different user via the drop down menu. Should you need to log in as a different account, try adding the following to the page you are on:

/_layouts/closeConnection.aspx?loginasanotheruser=true 

Get Web Sites Owners Listing (Powershell to Text File)

I created this script to gather a listing of web site owners within a Site Collection.  It has been set to only gather the first tier of sites.  If you wish to go deeper, change the comparision.

if ((Get-PSSnapin "Microsoft.SharePoint.PowerShell" -ErrorAction SilentlyContinue) -eq $null) {
    Add-PSSnapin "Microsoft.SharePoint.PowerShell"
}
function IterateSubSites ([Microsoft.SPWeb]$subSite)
{
    if ($subSite -ne $null)
    {
        if($subSite.Webs -ne $null)
        {
            foreach($subsites in $subSite.Webs)
            {
                IterateSubSites($subsites)
            }
        }
    }
}
 
$webApplicationURL = "http://contoso.com"
$webApp = Get-SPWebApplication $webApplicationURL
 
foreach($site in $webApp.Sites)
{
    foreach($subWeb in $site.AllWebs)
    {
       if(($subWeb.Url.Split("/") | measure-object).Count -lt 5)
{
        $output += $subWeb.Url + "`r`n`r`n"
        foreach($group in $subWeb.Groups)
        {
            if($group.Name -like "*Owners*")
            {
                $output += "Owner(s): " + "`r`n`r`n"
                foreach($user in $group.Users)
                {$output += $user.Name + " - " + $user.Email + "`r`n`r`n"; }
            }
        }
}
    }
    if($subWeb.IsRootWeb -ne $true)
    {
        IterateSubSites($subWeb)
    }
    $subWeb.Dispose()
}
$site.Dispose()
$output | Out-File "C:\owners.txt" 

Can not convert claims identity to windows token. This may be due to user not logging in using windows credentials.

Can not convert claims identity to windows token. This may be due to user not logging in using windows credentials.

saml-ssrs-before

If you receive this message when trying to run a report after upgrading your SharePoint environment to 2013, make sure that you have enabled the Claims To Windows Token Service on the SAME server that you have Reporting Services running on.  This will take care of that error.

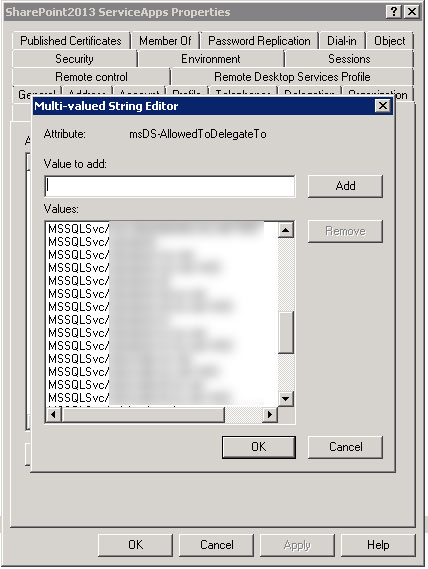
If after that you receive an error message indicating that you cannot logon as “NT Anonymous” you will further need to go in and set up your SharePoint Service account to have “AllowedDelegateTo” permission to the SQL Server you are trying to connect to.

In Active Directory Users and Computers, change the msDS-AllowedToDelegateTo attribute to include entries to your SQL Server(s).

msds-allowedtodelegateto

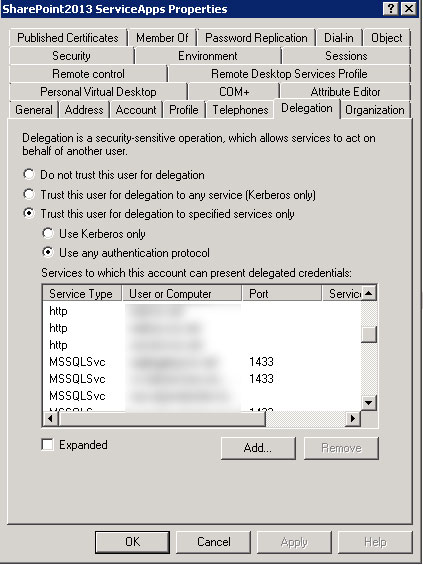
You may also wish to set it to allow any protocol.

useanyauth

Provision Search Service On Any SharePoint Server (with no migration)

This is based on scripts at http://www.harbar.net/articles/sp2013mt.aspx. I have modified the original script because if you are provisioning this on a server that is not the Central Admin server, you may get some NULL errors when you try to complete the component steps.  I have highlighted the part that I have changed.

This script will allow you to provision the search service application on any server of your choosing. Before you run this script, make sure you have activated the following services in Central Admin on the server you wish to set up your SSA on.

Search Host Controller Service
Search Query and Site Settings Service

$saAppPoolName = "Default SharePoint Service App Pool"
$searchServerName = (Get-ChildItem env:computername).value
$serviceAppName = "Search Service Application"
$searchDBName = "SearchService_DB"
$saAppPool = Get-SPServiceApplicationPool $saAppPoolName
Start-SPEnterpriseSearchServiceInstance $searchServerName
Start-SPEnterpriseSearchQueryAndSiteSettingsServiceInstance $searchServerName
$searchServiceApp = New-SPEnterpriseSearchServiceApplication -Name $serviceAppName -ApplicationPool $saAppPoolName -DatabaseName $searchDBName
$searchProxy = New-SPEnterpriseSearchServiceApplicationProxy -Name "$serviceAppName Proxy" -SearchApplication $searchServiceApp
$clone = $searchServiceApp.ActiveTopology.Clone()
$searchServiceInstance = Get-SPEnterpriseSearchServiceInstance | where-object{$_.Server.Name -eq $searchServerName}
New-SPEnterpriseSearchAdminComponent –SearchTopology $clone -SearchServiceInstance $searchServiceInstance
New-SPEnterpriseSearchContentProcessingComponent –SearchTopology $clone -SearchServiceInstance $searchServiceInstance
New-SPEnterpriseSearchAnalyticsProcessingComponent –SearchTopology $clone -SearchServiceInstance $searchServiceInstance 
New-SPEnterpriseSearchCrawlComponent –SearchTopology $clone -SearchServiceInstance $searchServiceInstance 
New-SPEnterpriseSearchIndexComponent –SearchTopology $clone -SearchServiceInstance $searchServiceInstance
New-SPEnterpriseSearchQueryProcessingComponent –SearchTopology $clone -SearchServiceInstance $searchServiceInstance
$clone.Activate()

Automatically Filing SharePoint Documents After Timespan

1) Set up a Document Library that will house the “temporary” documents (ie. the documents that you plan on having automatically filed).  For instance “New Documents.”

2) Then set up a separate “Custom” list that you will use as your routing list.  In this list enter all the names of the various other document libraries that you want to file your documents to.  For instance “Tax Records” and “Property Records.”

createcustomlist

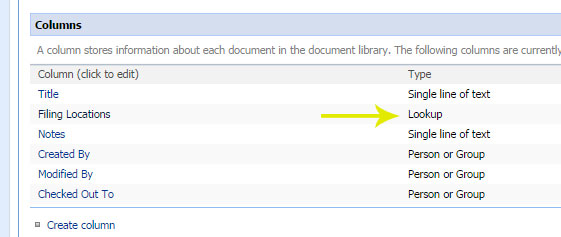
3) Go back to your “New Documents” library that you just created, and add a new column under “Document Library Settings.”  Give it a content type of “Lookup”, and tie it to the list you created in step 2.  Call it “Filing Location.”  *This can also be done with metadata if you have it enabled.

createlookupcolumn

4) Now that you have your infrastructure set up, it is time to create a workflow to automatically file the documents.  Open SharePoint Designer, and browse to your site. Choose to create a new workflow.

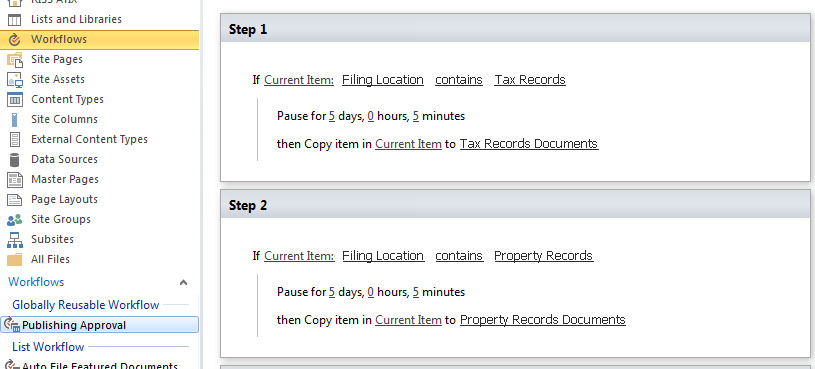
5) Link the workflow to your “New Documents” library.  Choose to activate the workflow whenever a new item is added. Enter the workflow steps in the following format:

  • Choosing to examine the “Filing Location” column.
  • If it matches one of the types you identify, choose to pause it for the time you desire to have it displayed in the “New Documents” library.  In this case, I will choose 5 days.
  • Then have the workflow copy the document (“Current Item”) to the desired matching document library.

filingworkflow

6) Repeat the previous step as many times as is necessary for the different document libraries you wish to file your documents to.

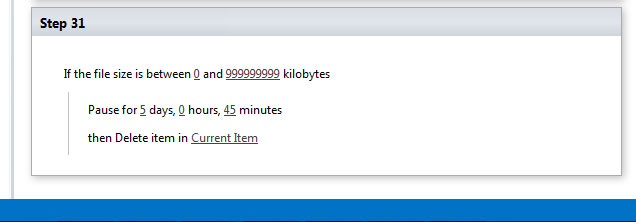
7) Finally, for the last step, choose to examine the file, and then pause it for a time period greater than the time you chose for step 5. Then add an instruction to delete the item after that time has passed.

deletionworkflowstep

8) Save the workflow.

9) Now when you add documents to the “New Documents” folder, they will be automatically filed.  However, when you upload them, you will also need to choose where they get filed under the “Filing Locations.”


How To Create A “Private” SharePoint Discussion Board

One of the requests I hear most from users is for the ability to create a private discussion board on their site.  They have a general user base, but want to lock down a particular SharePoint discussion board to just a small subset of users.  Unfortunately, there is no really obvious way to do this, so creating a “private” discussion board is a multi-step process.


The benefits to creating a private discussion board are numerous.  It can allow you to have a central location for having secure communication between team members, as well as provide the ability to share documents, all while remaining within the context of a parent site.  Typically, site admins would prefer to keep users on a single site, rather than go off and create subsites for all the different user sub-groups that want their own private area.  Private discussion boards are a great option for this.

To help those that might want to create one on their site, but not know where to start, I put together this little guide to help you create one.  While these screenshots are for SharePoint 2010, the same steps will also apply to SharePoint 2013, since the discussions list has remained essentially unchanged.

1) Go To “Site Actions”, click on “More Options…” You can also get to this menu by clicking “Create” when on the “Discussions” tab.
step1

2) Choose “Discussion Board” as the type. If you do not wish to have this on the navigation, do NOT click “OK” just yet.

step2

3) (optional) Click “More Options”. Enter the name of the private board. For Navigation, choose “No.” Then click OK.

step3

4) Once the board is created, you will need to modify the permissions to make it a private board. Click on “List Permissions.”

step4

5) THIS IS THE MOST IMPORTANT PART. **** DO NOT CLICK MANAGE PARENT **** If you change the permissions of the parent, you will mess up the permissions for the entire website.

Instead, click on “Stop Inheriting Permissions”

step5

6) Remove all the groups and users, except for the “Owners” group for the website. Click OK.

step6

7) Go to “Site Actions”, “Site Permissions”

step7

8) Create a new group for the private board (this step may be unnecessary if you already have a SharePoint group you wish to use)

step8

9) Give the group a name and set it to “Read Only”. *This does not mean it will be Read Only for the discussion board, it means it is a read only group for the site. If they have permissions that are elevated for the site, those will be taken care of by another group they are a member of. This group is just for the private board.

step9

10) Click “Create.” Once you complete this step, add the users or AD groups to the SharePoint group that need permission.

step10
11) Click “Site Actions”, “View All Site Content”

12) Click on the private discussion board you just created

step12

13) Click “List Permissions” and then “Grant Permissions”

step13
14) Use the people picker to find the group that you just created.

step14

15) Set the permission for the group as they relate to the private board. Typically “Contribute”, if it is an admin group set it to “Full Control”

step15

16) Verify the permissions

step16
17) Next we want to add a link to the private board. Go to “Site Actions” click on “Site Settings”

step17
18) Click on “Navigation”

step18
19) If you have a private discussions tab, click that, then click “Add Link”

step19
20) Give it a title and browse for the private board to create the link.

step20

22) Click OK, and check to see if the link appears.

23) (optional) Finally, if you created a group at the beginning, go into the group and add the members you want to grant access.  Click “Site Settings”, “Site Permissions”, and add users to the group.


Unable To Remove Server From Farm / cacheHostInfo is null

If you run into issues trying to remove a server from your SharePoint 2013 farm, particularly where you think the AppFabric install on that server is corruped/unfixable and you want to reinstall. Try the following. It worked for me.

1) Run the SP13 Configuration Wizard on the server you want to remove from the farm. Choose “Disconnect from Farm.”

2) After it finishes, head over to your Central Admin server.

3) Browse to “Servers In Farm” and see if the server you just removed is still there.

4) If it is still there, try clicking “Remove Server.”  This is where I got an error message indicating “cacheHostInfo is null,” and it would not let me proceed any further. This is because the server is still registered with the cache cluster and it is trying to remove it, but since the server has a bad/no entry for the cache info, it fails.

5) Fortunately, the server can be manually removed from the cache cluster through Powershell. While still on your Central Admin server, run the following script:

$SPFarm = Get-SPFarm
$cacheClusterName = "SPDistributedCacheCluster_" + $SPFarm.Id.ToString()
$cacheClusterManager = [Microsoft.SharePoint.DistributedCaching.Utilities.SPDistributedCacheClusterInfoManager]::Local
$cacheClusterInfo = $cacheClusterManager.GetSPDistributedCacheClusterInfo($cacheClusterName)
$instanceName ="SPDistributedCacheService Name=AppFabricCachingService"
$serviceInstance = Get-SPServiceInstance | ? {($_.Service.Tostring()) -eq $instanceName -and ($_.Server.Name) -eq "ComputerToRemoveName1"}
$serviceInstance.Delete()

Verify it is removed by running:

$cacheClusterInfo.CacheHostsInfoCollection

There are no products affected by this package installed on this system / Missing KB Packages

When running a cumulative update to the SharePoint 2013 farm servers, I encountered an error message in the Configuration Wizard.  It stated that there were missing packages on my non-central admin servers.

This was in spite of running the same cumulative updates on all the servers (????)

When I attempted to run the cumulative update installation again, the package check came back with the following message:

There are no products affected by this package installed on this system

I tried multiple options, such as restarting IIS, the SharePoint Timer Service, and the servers themselves, however, none of those resolved the issue or allowed the wizard to detect that those updates were already installed on the other servers.

Finally I came across a post indicating that the servers should be removed from the farm and then re-added again. I did so, and that resolved the issue.

SharePoint 2013 Re-installation – Prerequisite Installer Continuously Restarts

If you are attempting to re-install SharePoint on a server, after you have run the uninstall option for both SharePoint 2013 and Appfabric 1.1, you may encounter an issue when running the Prerequisite Installer.

It may reach the end of the installation process and then ask to reboot. When the server comes back up it may go through the same process over again, and then continue to reboot over and over again.   The solution is to go into the registry editor (regedit) and browse to: HKEY_LOCAL_MACHINE/SYSTEM/CurrentControlSet/Control/Session Manager/Enviroment/PSModulePath

If there is an entry there, the uninstall option for Appfabric did not fully remove itself, leaving behind an old entry.

Remove that key and reboot the server.

psmodulepath


Now when you attempt to run the Prerequisite Installer, it will complete successfully.