I ran into a bit of a snag migrating a SharePoint 2010 Web Application that had utilized SQL Reporting Services. This was mainly because there is not a lot of helpful documentation on the web. Hopefully this will help if you are struggling to find the information you need.
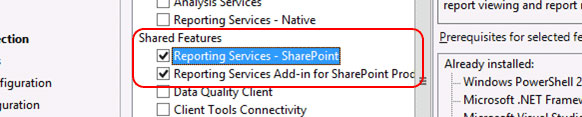
1) The first thing you will want to do is ensure that you have installed the SSRS components for SharePoint. To do this, I recommend finding a copy of the SQL version you are using and running the install on your SharePoint servers, but only installing the necessary SharePoint bits.
You may also want to download and run the latest version of rsSharepoint.msi for good measure: http://www.microsoft.com/en-us/download/details.aspx?id=35583
After that, you’ll want to run the following commands via the SharePoint 2013 Management Shell:
Install-SPRSService
Install-SPRSServiceProxy
Get-spserviceinstance -all |where {$_.TypeName -like "SQL Server Reporting*"} | Start-SPServiceInstance”
2) After completing this, you should be able to see an option to create a new “SQL Server Reporting Services Service Application” under “Manage Service Applications”

From here, go ahead and create a new SSRS Service App. Give it a name like “SSRS”, use the existing Default Service App Pool, and get rid of the GUIDs on the database name. (Although you will soon be getting rid of those DBs anyway.) Normally, you’d stop here if you were doing a “fresh” SSRS install.
However, if you are like me, and you have sites in SharePoint 2010 that already have SSRS reports you have been using that have stored processing options, history records and subscriptions, starting all over just isn’t an option.
This is where the migration comes in.
3) You will need a few things from your previous SharePoint 2010 environment.
- A backup copy of the encryption keys
- Report Server DB
- Report Server Temp DB
To get a backup of your encryption keys, log onto your SharePoint 2010 server that is being used for Reporting Services currently. Go to “Reporting Services Configuration Manager” which can be found under your SQL “Configuration Tools.” Connect to your server. On the left, click on “Encryption Keys” and then select “Backup.” Create a new password and write it down somewhere.
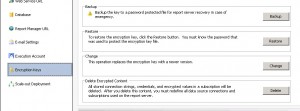
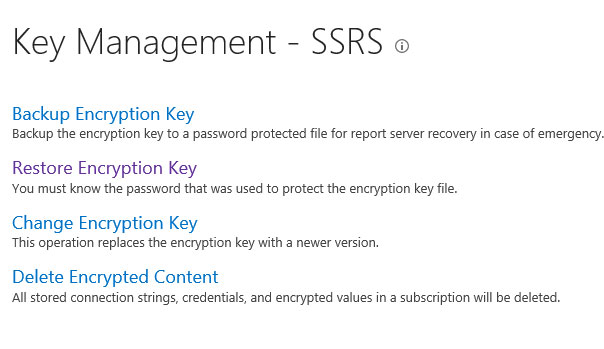
4) Copy that file over to your SharePoint 2013 server. Go to “Manage Service Applications” and click on “SSRS” (the service app you just created). Click on “Key Management.” Then click “Restore Encryption Key.”
5) Once you’ve restored the key, move on to the databases. You will need to get a backup of your SP2010 Reporting Services databases. Typically, these are titled something like “ReportServer_DB” & “ReportServer_TempDB”. Attach those databases to your 2013 farm and make sure you update the owner to your 2013 farm account.
6) (optional) Depending on if you have a lot of customizations, at this point you may also want to copy the configuration files from your SharePoint 2010 machine to “C:\Program Files\Common Files\Microsoft Shared\Web Server Extensions\15\WebServices\Reporting”. (I didn’t have any customizations, so I skipped this step). Example files:
- Rsreportserver.config
- Rssvrpolicy.config
- Web.config for the Report Server ASP.NET application.
- Machine.config for ASP.NET.
7) Now here’s where the tricky part comes in. You will need to go back to the SharePoint 2013 Management Shell and run the following:
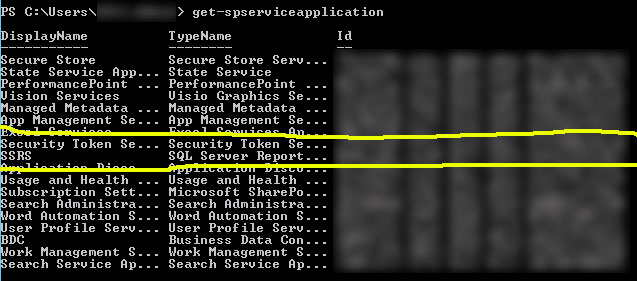
Get-SPServiceApplication
Find the GUID for the SQL Server Reporting Services, and copy it.
Then run:
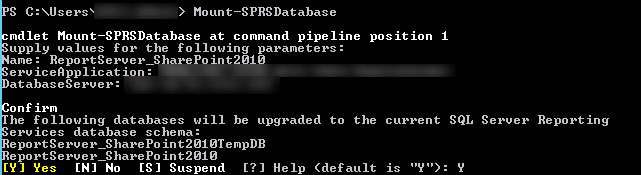
Mount-SPRSDatabase
Supply the database name, service application GUID (which you just copied), and database server.
Run the following to check your work. You should see both the new database and the one you just mounted.
Get-SPRSDatabase

Finally, you will want to clean up the SSRS Service by deleting the temporary DB. Grab the GUID of the DB above that is the temporary one. Run the following and enter the GUID:
Remove-SPRSDatabase

8) Once you’ve done all that. Navigate to your Web Applications. Click on the Web Application that needs SSRS, and click “Service Connections” in the ribbon.

You should then have the option to associate your upgraded SSRS Service with your upgraded SharePoint 2010 Web App.
You may also want to go back in to your SSRS Service App and update some of the settings, such as your email server, etc.
Also, do not forget to update the permissions for any new service app accounts so that it can get to your content database.
Some helpful links:
SP10 to SP13 SSRS Migration Overview
http://msdn.microsoft.com/en-us/library/hh759331.aspx
SharePoint Powershell Commands for SSRS:
http://msdn.microsoft.com/en-us/library/gg492249.aspx