How To Create A “Private” SharePoint Discussion Board

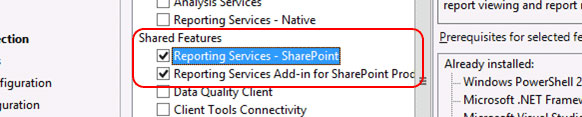
One of the requests I hear most from users is for the ability to create a private discussion board on their site.  They have a general user base, but want to lock down a particular SharePoint discussion board to just a small subset of users.  Unfortunately, there is no really obvious way to do this, so creating a “private” discussion board is a multi-step process.


The benefits to creating a private discussion board are numerous.  It can allow you to have a central location for having secure communication between team members, as well as provide the ability to share documents, all while remaining within the context of a parent site.  Typically, site admins would prefer to keep users on a single site, rather than go off and create subsites for all the different user sub-groups that want their own private area.  Private discussion boards are a great option for this.

To help those that might want to create one on their site, but not know where to start, I put together this little guide to help you create one.  While these screenshots are for SharePoint 2010, the same steps will also apply to SharePoint 2013, since the discussions list has remained essentially unchanged.

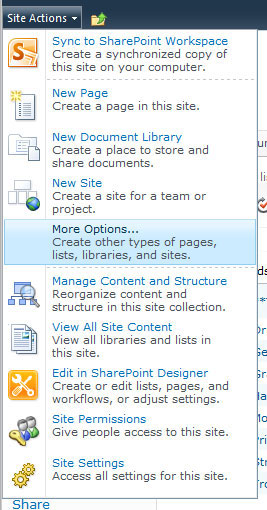
1) Go To “Site Actions”, click on “More Options…” You can also get to this menu by clicking “Create” when on the “Discussions” tab.
step1

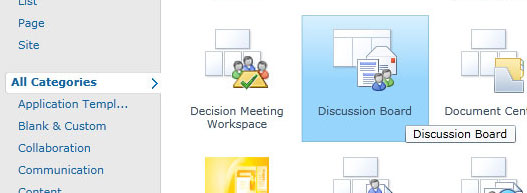
2) Choose “Discussion Board” as the type. If you do not wish to have this on the navigation, do NOT click “OK” just yet.

step2

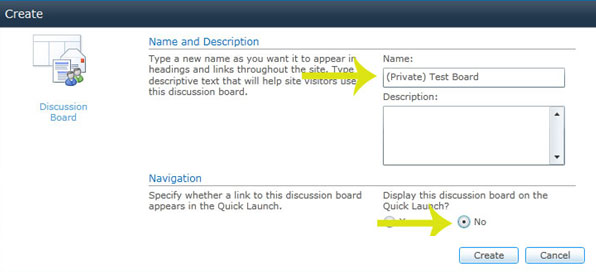
3) (optional) Click “More Options”. Enter the name of the private board. For Navigation, choose “No.” Then click OK.

step3

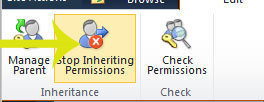
4) Once the board is created, you will need to modify the permissions to make it a private board. Click on “List Permissions.”

step4

5) THIS IS THE MOST IMPORTANT PART. **** DO NOT CLICK MANAGE PARENT **** If you change the permissions of the parent, you will mess up the permissions for the entire website.

Instead, click on “Stop Inheriting Permissions”

step5

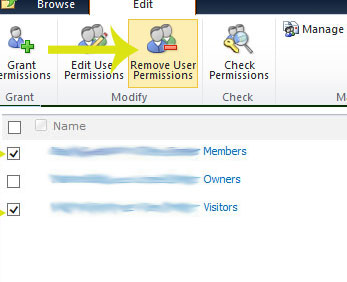
6) Remove all the groups and users, except for the “Owners” group for the website. Click OK.

step6

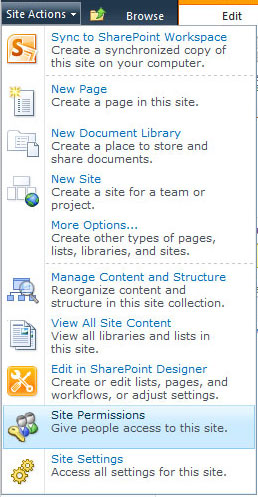
7) Go to “Site Actions”, “Site Permissions”

step7

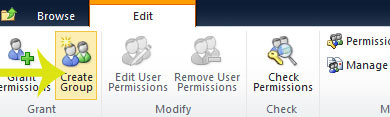
8) Create a new group for the private board (this step may be unnecessary if you already have a SharePoint group you wish to use)

step8

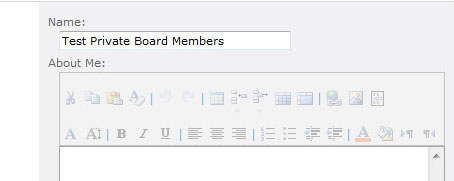
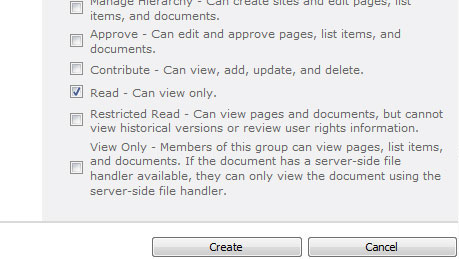
9) Give the group a name and set it to “Read Only”. *This does not mean it will be Read Only for the discussion board, it means it is a read only group for the site. If they have permissions that are elevated for the site, those will be taken care of by another group they are a member of. This group is just for the private board.

step9

10) Click “Create.” Once you complete this step, add the users or AD groups to the SharePoint group that need permission.

step10
11) Click “Site Actions”, “View All Site Content”

12) Click on the private discussion board you just created

step12

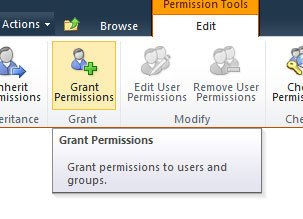
13) Click “List Permissions” and then “Grant Permissions”

step13
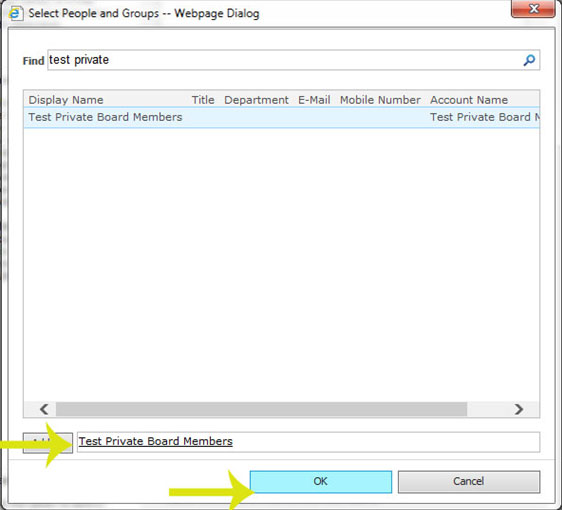
14) Use the people picker to find the group that you just created.

step14

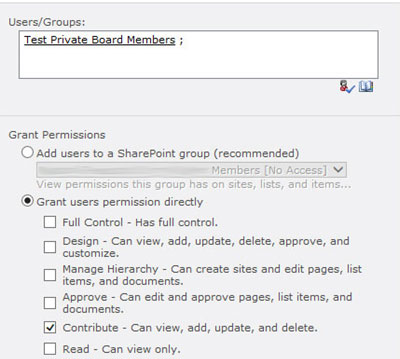
15) Set the permission for the group as they relate to the private board. Typically “Contribute”, if it is an admin group set it to “Full Control”

step15

16) Verify the permissions

step16
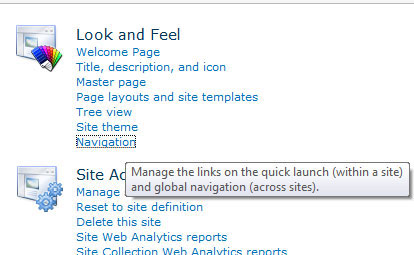
17) Next we want to add a link to the private board. Go to “Site Actions” click on “Site Settings”

step17
18) Click on “Navigation”

step18
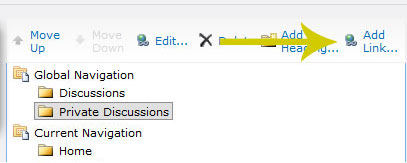
19) If you have a private discussions tab, click that, then click “Add Link”

step19
20) Give it a title and browse for the private board to create the link.

step20

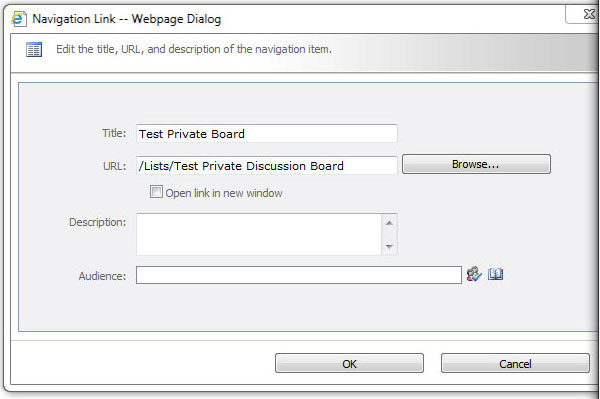
22) Click OK, and check to see if the link appears.

23) (optional) Finally, if you created a group at the beginning, go into the group and add the members you want to grant access.  Click “Site Settings”, “Site Permissions”, and add users to the group.


Unable To Remove Server From Farm / cacheHostInfo is null

If you run into issues trying to remove a server from your SharePoint 2013 farm, particularly where you think the AppFabric install on that server is corruped/unfixable and you want to reinstall. Try the following. It worked for me.

1) Run the SP13 Configuration Wizard on the server you want to remove from the farm. Choose “Disconnect from Farm.”

2) After it finishes, head over to your Central Admin server.

3) Browse to “Servers In Farm” and see if the server you just removed is still there.

4) If it is still there, try clicking “Remove Server.”  This is where I got an error message indicating “cacheHostInfo is null,” and it would not let me proceed any further. This is because the server is still registered with the cache cluster and it is trying to remove it, but since the server has a bad/no entry for the cache info, it fails.

5) Fortunately, the server can be manually removed from the cache cluster through Powershell. While still on your Central Admin server, run the following script:

$SPFarm = Get-SPFarm
$cacheClusterName = "SPDistributedCacheCluster_" + $SPFarm.Id.ToString()
$cacheClusterManager = [Microsoft.SharePoint.DistributedCaching.Utilities.SPDistributedCacheClusterInfoManager]::Local
$cacheClusterInfo = $cacheClusterManager.GetSPDistributedCacheClusterInfo($cacheClusterName)
$instanceName ="SPDistributedCacheService Name=AppFabricCachingService"
$serviceInstance = Get-SPServiceInstance | ? {($_.Service.Tostring()) -eq $instanceName -and ($_.Server.Name) -eq "ComputerToRemoveName1"}
$serviceInstance.Delete()

Verify it is removed by running:

$cacheClusterInfo.CacheHostsInfoCollection

There are no products affected by this package installed on this system / Missing KB Packages

When running a cumulative update to the SharePoint 2013 farm servers, I encountered an error message in the Configuration Wizard.  It stated that there were missing packages on my non-central admin servers.

This was in spite of running the same cumulative updates on all the servers (????)

When I attempted to run the cumulative update installation again, the package check came back with the following message:

There are no products affected by this package installed on this system

I tried multiple options, such as restarting IIS, the SharePoint Timer Service, and the servers themselves, however, none of those resolved the issue or allowed the wizard to detect that those updates were already installed on the other servers.

Finally I came across a post indicating that the servers should be removed from the farm and then re-added again. I did so, and that resolved the issue.

SharePoint 2013 Re-installation – Prerequisite Installer Continuously Restarts

If you are attempting to re-install SharePoint on a server, after you have run the uninstall option for both SharePoint 2013 and Appfabric 1.1, you may encounter an issue when running the Prerequisite Installer.

It may reach the end of the installation process and then ask to reboot. When the server comes back up it may go through the same process over again, and then continue to reboot over and over again.   The solution is to go into the registry editor (regedit) and browse to: HKEY_LOCAL_MACHINE/SYSTEM/CurrentControlSet/Control/Session Manager/Enviroment/PSModulePath

If there is an entry there, the uninstall option for Appfabric did not fully remove itself, leaving behind an old entry.

Remove that key and reboot the server.

psmodulepath


Now when you attempt to run the Prerequisite Installer, it will complete successfully.

Creating a Classic Authentication Web Application in SharePoint 2013

To create a new web application using classic mode, run the following:

New-SPWebApplication -Name "Portal" -ApplicationPool "Classic App Pool" -AuthenticationMethod "Kerberos" -ApplicationPoolAccount"Contoso\SPFarm" -Port 80 -URL "http://portal.contoso.com" -Path "C:\inetpub\wwwroot\wss\VirtualDirectories\Portal" -HostHeader "portal.contoso.com" 

If you are (most likely) upgrading a content database from SharePoint 2010, you will need to run the Test-SPContentDatabase / Mount-SPContentDatabase commands afterwards to get your old database associated with the new web application.  You cannot attach a 2010 content database and create the web application in Kerberos mode simultaneously.

Be sure to register the farm account as a managed account, and also add your Kerberos entries using SETSPN before running this.

Moving the Search Service Application to a Different Farm Server

For performance reasons, you may wish to move the Search Service Application in SharePoint 2013 to a different farm server. After adding the server to the farm, and provisioning the Search Service, in order to move the service, you will need to do so through Powershell, as that is the only way to get the components moved over.

Rather than breaking up the SSA components onto multiple servers, to reduce lag, etc. between servers, its suggested to keep the components together on the same server.

before-moving-ssa

So for instance, you may have Central Admin running on Server A, along with the User Sync and Search. To reduce the load on Server A, you may want to move the entire search portion over to Server B.

To do so, run the following commands:

$ssa = Get-SPEnterpriseSearchServiceApplication
$active = Get-SPEnterpriseSearchTopology -SearchApplication $ssa -Active
$clone = New-SPEnterpriseSearchTopology -SearchApplication $ssa -Clone –SearchTopology $active
$newSrv = Get-SPEnterpriseSearchServiceInstance -Identity <<Server B Name>>
New-SPEnterpriseSearchQueryProcessingComponent -SearchTopology $clone -SearchServiceInstance $newSrv
New-SPEnterpriseSearchAnalyticsProcessingComponent -SearchTopology $clone -SearchServiceInstance $newSrv
New-SPEnterpriseSearchContentProcessingComponent -SearchTopology $clone -SearchServiceInstance $newSrv
New-SPEnterpriseSearchCrawlComponent -SearchTopology $clone -SearchServiceInstance $newSrv
New-SPEnterpriseSearchAdminComponent -SearchTopology $clone -SearchServiceInstance $newSrv
New-SPEnterpriseSearchIndexComponent –SearchTopology $clone -SearchServiceInstance $newSrv -IndexPartition 0
Start-SPEnterpriseSearchServiceInstance -Identity $newSrv
Set-SPEnterpriseSearchTopology -Identity $clone

Next, you will need to re-clone it again to remove the old components off the old server

$ssa = Get-SPEnterpriseSearchServiceApplication
$active = Get-SPEnterpriseSearchTopology -SearchApplication $ssa -Active
$clone = New-SPEnterpriseSearchTopology -SearchApplication $ssa -Clone –SearchTopology $active

Run the following, this will give you a list of all the component IDs you will need to remove them from Server A

Get-SPEnterpriseSearchComponent -SearchTopology $clone

Replace the IDs in the following commands:

Remove-SPEnterpriseSearchComponent -Identity <<Server A Component ID>> -SearchTopology $clone -confirm:$false
Set-SPEnterpriseSearchTopology -Identity $clone

Run a refresh in central admin, and you should see the following:

after-moving-ssa

Using CQWP To Show Discussion Rollup with Reply Count and Last Update Date

This is what we want our final result to look like:

DiscussionRollupFinal

1) Add a Content Query Web Part to your page.  Go in and expand the “Query” section.  Modify it to show just the discussions for your site.  Then click OK.  Verify that you can see your discussions.

DiscussionRollupStep1

2) This is where things get a little tricky.  You will need to access the ItemStyle.xsl file of your site, and modify it by adding a new template within the file.  Just find a spot where the templates are within that file and copy and paste the following template entry (be sure to keep what you already have in that file):

<xsl:template name="DiscussionAndReplies" match="Row[@Style='DiscussionAndReplies']" mode="itemstyle">
 <xsl:variable name="vv1"> 
 <xsl:value-of select="@LinkUrl"/> 
 </xsl:variable>
 <xsl:variable name="formattedLastUpdatedDate">
 <xsl:value-of select="ddwrt:FormatDateTime(string(@DiscussionLastUpdated) ,1033 ,'dd MMM yyyy')" />
 </xsl:variable>
 <xsl:variable name="listTitleEnd">
 <xsl:call-template name="substring-before-last">
 <xsl:with-param name="list" select="@LinkUrl" />
 <xsl:with-param name="delimiter" select="'/'" />
 </xsl:call-template>
 </xsl:variable>
 <xsl:variable name="listTitle">
 <xsl:call-template name="substring-after-last">
 <xsl:with-param name="string" select="$listTitleEnd" />
 <xsl:with-param name="delimiter" select="'/'" />
 </xsl:call-template>
 </xsl:variable>
 <xsl:variable name="DisplayTitle">
 <xsl:call-template name="OuterTemplate.GetTitle">
 <xsl:with-param name="Title" select="@Title"/>
 <xsl:with-param name="UrlColumnName" select="'LinkUrl'"/>
 </xsl:call-template>
 </xsl:variable>
 <xsl:variable name="LinkTarget">
 <xsl:if test="@OpenInNewWindow = 'True'" >_blank</xsl:if>
 </xsl:variable>
 <div class="item link-item">
 <a href="{$vv1}" target="{$LinkTarget}" title="{@LinkToolTip}"> 
 [<xsl:value-of select="$listTitle" />] <xsl:value-of select="$DisplayTitle"/> - Replies:(<xsl:value-of select="substring-after(@ItemChildCount,'#') "/>) - Last updated: <xsl:value-of select="$formattedLastUpdatedDate" />
 </a>
 </div>
</xsl:template>

3) Once you’ve done that, go back and edit your Content Query Web Part.  Now, scroll down to “Presentation” and expand it.  Be sure to select the sorting / counts you’d like displayed.  Then be sure to select your new style template you just added.

DiscussionRollupStep2

5) If you are using SharePoint 2013, you will want to make sure you add the entry for the ItemChildCount, as it will not be picked up automatically.  (I spent a good couple hours trying to figure out why it would display in SP2010 and not SP2013.)

DiscussionRollupStep3

6) Click ok, and voila!  A nice rollup of a more detailed view of the discussion content on your site.

DiscussionRollupFinal

SharePoint 2013 Search Not Returning Results / SP1 Configuration Wizard Fails At Step 8

We recently upgrade our environment from SharePoint 2010 to SharePoint 2013.  As part of the upgrade we created a new search service application, performed database attach upgrades for our content and then ran the appropriate crawls.

Along the way, we encountered an issue where search results were not being returned.  Just a correlation ID, and a “Web part could not be displayed” error.  Curiously, there did not appear to be anything wrong with the Search Service Application, or the Web Application.

Thinking the issue could have been some sort of SharePoint bug, we attempted to upgrade our environment to SP1.  All the front end servers upgraded fine, but the server hosting Central Admin and the Search Service Application failed at step 8.

It turns out the solution was to re-provision the Search Service Application, and then clear the SharePoint Configuration Cache.

$ssa = Get-SPEnterpriseSearchServiceApplication "Search Service Application"
$ssa.Status = "Disabled"
$ssa.Update()
$ssa.Provision()
  • Stop the “SharePoint Administration” and “SharePoint Timer Service”
    stopservice
  • Browse to %SystemDrive%\ProgramData\Microsoft\SharePoint\Config\<GUID>
  • Select every file *EXCEPT* Cache.ini
    deleteconfigurationfiles
  • Delete the all XML configuration files
  • Open Cache.ini. Delete all the contents of the file, and type 1
  • (This will cause the configuration cache to rebuild itself.)
  • Start the “SharePoint Timer Service” and “SharePoint Administration” service.

Try searching for content on your site. It may take a minute as the cache will need to rebuild.

If all goes well you should see results. You should also be able to run the SharePoint Configuration Wizard successfully now.

How to install PDF iFilter for SharePoint 2013

SharePoint 2013 out of the box supports PDF crawling, making installing a PDF iFilter unnecessary.

Despite this, it does however support iFilters, so if there is one you are looking to install for other file types, it does support this.

Migrating SharePoint 2010 Reporting Services To SharePoint 2013

I ran into a bit of a snag migrating a SharePoint 2010 Web Application that had utilized SQL Reporting Services.  This was mainly because there is not a lot of helpful documentation on the web.  Hopefully this will help if you are struggling to find the information you need.

1) The first thing you will want to do is ensure that you have installed the SSRS components for SharePoint.  To do this, I recommend finding a copy of the SQL version you are using and running the install on your SharePoint servers, but only installing the necessary SharePoint bits.

installssrsforsharepoint

You may also want to download and run the latest version of rsSharepoint.msi for good measure: http://www.microsoft.com/en-us/download/details.aspx?id=35583

After that, you’ll want to run the following commands via the SharePoint 2013 Management Shell:

Install-SPRSService 
Install-SPRSServiceProxy
Get-spserviceinstance -all |where {$_.TypeName -like "SQL Server Reporting*"} | Start-SPServiceInstance”

2) After completing this, you should be able to see an option to create a new “SQL Server Reporting Services Service Application” under “Manage Service Applications”

newssrsserviceapp

From here, go ahead and create a new SSRS Service App.  Give it a name like “SSRS”, use the existing Default Service App Pool, and get rid of the GUIDs on the database name.  (Although you will soon be getting rid of those DBs anyway.)  Normally, you’d stop here if you were doing a “fresh” SSRS install.

However, if you are like me, and you have sites in SharePoint 2010 that already have SSRS reports you have been using that have stored processing options, history records and subscriptions, starting all over just isn’t an option.

This is where the migration comes in.

3) You will need a few things from your previous SharePoint 2010 environment.

  • A backup copy of the encryption keys
  • Report Server DB
  • Report Server Temp DB

To get a backup of your encryption keys, log onto your SharePoint 2010 server that is being used for Reporting Services currently.  Go to “Reporting Services Configuration Manager” which can be found under your SQL “Configuration Tools.”  Connect to your server.  On the left, click on “Encryption Keys” and then select “Backup.”  Create a new password and write it down somewhere.

encryptionkeysbackup

4) Copy that file over to your SharePoint 2013 server.  Go to “Manage Service Applications” and click on “SSRS”  (the service app you just created).  Click on “Key Management.” Then click “Restore Encryption Key.”

restorekey

5) Once you’ve restored the key, move on to the databases.  You will need to get a backup of your SP2010 Reporting Services databases.  Typically, these are titled something like “ReportServer_DB” & “ReportServer_TempDB”.  Attach those databases to your 2013 farm and make sure you update the owner to your 2013 farm account.

6) (optional) Depending on if you have a lot of customizations, at this point you may also want to copy the configuration files from your SharePoint 2010 machine to “C:\Program Files\Common Files\Microsoft Shared\Web Server Extensions\15\WebServices\Reporting”.  (I didn’t have any customizations, so I skipped this step).  Example files:

  • Rsreportserver.config
  • Rssvrpolicy.config
  • Web.config for the Report Server ASP.NET application.
  • Machine.config for ASP.NET.

7) Now here’s where the tricky part comes in.  You will need to go back to the SharePoint 2013 Management Shell and run the following:

Get-SPServiceApplication

Find the GUID for the SQL Server Reporting Services, and copy it.

get-spserviceapps

Then run:

Mount-SPRSDatabase

Supply the database name, service application GUID (which you just copied), and database server.

mount-upgrade

Run the following to check your work.  You should see both the new database and the one you just mounted.

Get-SPRSDatabase

get-sprsdatabase

Finally, you will want to clean up the SSRS Service by deleting the temporary DB.  Grab the GUID of the DB above that is the temporary one.  Run the following and enter the GUID:

Remove-SPRSDatabase

remove-sprsdatabase

8) Once you’ve done all that.  Navigate to your Web Applications.  Click on the Web Application that needs SSRS, and click “Service Connections” in the ribbon.

serviceconnections

You should then have the option to associate your upgraded SSRS Service with your upgraded SharePoint 2010 Web App.

You may also want to go back in to your SSRS Service App and update some of the settings, such as your email server, etc.

Also, do not forget to update the permissions for any new service app accounts so that it can get to your content database.

Some helpful links:

SP10 to SP13 SSRS Migration Overview
http://msdn.microsoft.com/en-us/library/hh759331.aspx

SharePoint Powershell Commands for SSRS:
http://msdn.microsoft.com/en-us/library/gg492249.aspx