SharePoint Search Box Not Firing When Enter Pressed in IE

Ran into an issue in SP2013/SP2010 where the Enter/Return key would default to other page elements instead of taking the keywords and conducting the search if the Enter key was pressed. So for example, if there was a button on the page, it would fire that element, instead of the search box. Here is a simple bit of jQuery which will ensure that the user’s search gets completed:

//fix for IE 11 Enter/Return key not firing for Search box
jQuery("input[id^=ctl00_PlaceHolderSearchArea]").keypress(function(event){
  if(event.which == 13) 
  {
    window.location = jQuery("a[id^=ctl00_PlaceHolderSearchArea]").attr('href');
   }		        
});

Filtering SharePoint Search by Calendar Dates

SharePoint, out of the box does not support filtering calendar dates.  The reason for this is that to search, they are set up as strings, thus running a comparision is not achievable.  Example: Let’s say you are using the Search API, and only want to show events that have not taken place yet.  There is nothing within search that will allow you to do this, without doing some tweaks.

In order to accomplish this, you will first need to set up a custom mapping for search to pick up the calendar date as a DateTime datatype.

1. In Central Admin, click on the Search Service Application

2. Click on Search Schema

3. Click “New Managed Property” and fill it out like the following.  Be sure to set the type as “Date and Time”. Then click OK.

Be sure to map the “ows_q_Date_EndDate” and “ows_q_Date__EndDate” properties.

4. Once the property has been mapped, you will need to run a Full Crawl in order for search to pick up the new property.

5. Then after the crawl has finished, and the new mapped datatype is available, you can run a query for new training events that have not yet taken place:

https://sharepoint.company.com/_api/search/query?querytext='*training* -path:"https://sharepoint.company.com/management/"'&refinementfilters='and(ContentTypeID:0x0102*,CalendarEndDate:range([Today],max,from="ge"))'&clienttype='AllResultsQuery'&rowlimit=10&sortlist='CalendarEndDate:descending'

A few things to note in the query:

  • ContentTypeID:0x0102* is the SharePoint content type for calendar events
  • [Today] will need to be replaced in your code with today’s actual date and time in string format, so: ‘2017-01-01’ (or DateTime.Now.ToString(“yyyy-MM-dd”))
  • This query also includes an optional exclusion (-path:”https://sharepoint.company.com/management/”), if you do not want a particular calendar or site included in the results.

This will return you calendar events matching the keyword, that have also not taken place yet.

Setting up Office Web Apps Server for SharePoint & Publishing via ADFS WAP

1. Create a new vanity DNS entry for Office Web Apps that points to the ADFS WAP for public consumption (ie. officewebapps.contoso.com -> 10.92.92.100)

2. Download and run install software [i.e. en_office_web_apps_server_2013_with_sp1_x64_dvd_3833121] on server that is not in SharePoint Farm.  Office Web Apps Server cannot be installed on server hosting SharePoint. There are several prerequisites that it may prompt you to install (IIS, .NET, etc.). You may also need to uninstall this hotfix for .NET 4.6.1: Update for Microsoft Windows (KB3102467)

install-office-web-apps-server

3. Ensure there is a cert installed on the Office Web Apps Server for use (i.e. wildcard), if none is available, one must be installed.  Set the friendly name if none exists.  Install certificate under Personal Certificates for the local computer.

To set friendly name, run MMC as an admin. Go to “File”, “Add/Remove Snap In”,  choose “Certificates”, manage Certificates for “Computer account”, then “Next”, keep option for “Local Computer” selected, click “Finish”, then “OK”. Navigate to Personal Certificates, then right click on the certificate you just installed and click “Properties.” Set the friendly name to a name of your choice.
set-friendly-name

4. After install, run the following PowerShell on the Office Web Apps Server:

 New-OfficeWebAppsFarm -Verbose -InternalUrl https://officewebapps.contoso.com -ExternalUrl https://officewebapps.contoso.com 
-CertificateName CertFriendlyName -ClipartEnabled –TranslationEnable

5. On SharePoint Server, run the following under the SharePoint Management Shell:

 New-SPWOPIBinding -ServerName webappsservername.contoso.com 

(must be fully qualified server name)

(Optional depending on your internal network configuration):

If you are seeing error messages (such as Event ID 3005, “We couldn’t find the file you wanted”,  “Server Error in ‘/x’ Application”, etc.) You may also need to add a hosts entry on your Office Web Apps Server that points portal.contoso.com directly to your SharePoint WFE.  The reason being is that OWAS cannot read the Office files from SharePoint through ADFS, if portal.contoso.com resolves to your ADFS.

7. Log onto ADFS WAP server. Add hosts file entry that points officewebapps.contoso.com to actual Office Web Apps Server IP to override the DNS entry. (ie. 10.92.92.101   officewebapps.contoso.com)

8. Publish Office Web Apps Server with public URL (https://officewebapps.contoso.com). Set to “Pass Through” instead of “ADFS”.

office-web-apps-wap-pass-though

office-web-apps-wap-entry

9. Your done. To test, try opening an Office document in SharePoint, or try navigating to: https://officewebapps.contoso.com/hosting/discovery

Sending an Email in SharePoint 2013 via Javascript (REST API)

I was looking for a way to send an email in SharePoint that didn’t require a compiled solution, since that usually involved scheduled maintenance windows.  I stumbled upon “SP.Utilities.Utility.SendEmail” in my searches.  This is a super simple way to get an email sent, with minimal hassle.

There really is only one catch here. The email recipient(s) must be users that have visited the site.  (ie. company email accounts).  Random email accounts that have not been authenticated to SharePoint will throw an error.

I will also note, that if you get a 403 Forbidden error, the problem could be one of two things.

  1. You should first check to make sure you are getting the digest. A simple “alert” should let you know.  If you are not getting the digest (ie. maybe your form isn’t in a SP masterpage), try using Scot Hillier’s “Wingtip” helper to grab it: http://www.shillier.com/archive/2013/09/08/managing-sharepoint-2013-app-context.aspx
  2. If you are getting the digest, it could be the same issue I ran into. I had an older version of jQuery (1.4.2).  Upgrading to a newer version (1.11) solved the 403 issue for me.

The HTML can be added to a simple Content Editor Web Part, or elsewhere…

​​Full Name: ​<br/>
<input type="text" name="fname" id="fname" placeholder="Your Full Name"/><br/> 
Your Email: <br/>
<input type="text" name="femail" id="femail" placeholder="Your Email Address"/><br/>
Your Message: <br/>
<textarea rows="4" cols="50" id="fmessage"></textarea><br/><br/>
<button type="button" id="fbutton">Send Message</button> 
<script type="text/javascript" src="jquery.js"></script>​​​​​​​​​​​​ 
<script type="text/javascript" src="emailform.js"></script> ​​​​​​​​​​​​​​

emailform.js code:

$(document).ready(function() {
    $("#fbutton").click(function(){
       var siteurl = _spPageContextInfo.webServerRelativeUrl;
       var name = $("#fname").val();
       var from = $("#femail").val();
       var msg = 'From: ' + name + '<br/><br/>' + 'Email: ' + from + '<br/><br/><br/>' + $("#fmessage").val();

       var urlTemplate = siteurl + "_api/SP.Utilities.Utility.SendEmail";

       $.ajax({
         contentType: 'application/json',
         url: urlTemplate,
         type: "POST",
         data: JSON.stringify({
            'properties': {
              '__metadata': { 'type': 'SP.Utilities.EmailProperties' },
              'From': from,
              'To': { 'results': ['jdoe@company.com'] },
              'Body': msg,
              'Subject':'New Message From SharePointWebsite'
             }
           }),
         headers: {
            "Accept": "application/json;odata=verbose",
            "content-type": "application/json;odata=verbose",
            "X-RequestDigest": $("#__REQUESTDIGEST").val()                 
         },
         success: function (data) {
           alert('Your message has been sent');
           $("#fname").val('');
           $("#femail").val('');
           $("#fmessage").val('');
         },
         error: function (err) {
            alert(JSON.stringify(err));
         }
      });
   });          
});

Errors When Adding SP2013 Navigation in SP2010 UI Mode

There is an rather obscure error that can occur when working with “Audiences” and groups in SharePoint 2010 mode within SharePoint 2013. The problem can surface when trying to create list items based around audiences. Items can be created just fine, but when trying to add an audience trimming to the item, SharePoint can throw an error. This is related to how the form within IE is storing the HTML for the audience.

To get around this, you will need to change your Compatibility View setting within IE.

See example:

Add A Link:

click-add-link

Create a link and give it an audience trimming:

adding-a-sharepoint-link

SharePoint Throws An Error:

error-adding-navigation

Navigate to Compatibility Setttings:

go-to-compatibility

Change Compatibility Settings to use Compatibility View:

change-compatibility-for-sh

Navigational items should now save successfully.

Log In as different user (SP2013)

SharePoint 2013 took away the ability to log in as a different user via the drop down menu. Should you need to log in as a different account, try adding the following to the page you are on:

/_layouts/closeConnection.aspx?loginasanotheruser=true 

Get Web Sites Owners Listing (Powershell to Text File)

I created this script to gather a listing of web site owners within a Site Collection.  It has been set to only gather the first tier of sites.  If you wish to go deeper, change the comparision.

if ((Get-PSSnapin "Microsoft.SharePoint.PowerShell" -ErrorAction SilentlyContinue) -eq $null) {
    Add-PSSnapin "Microsoft.SharePoint.PowerShell"
}
function IterateSubSites ([Microsoft.SPWeb]$subSite)
{
    if ($subSite -ne $null)
    {
        if($subSite.Webs -ne $null)
        {
            foreach($subsites in $subSite.Webs)
            {
                IterateSubSites($subsites)
            }
        }
    }
}
 
$webApplicationURL = "http://contoso.com"
$webApp = Get-SPWebApplication $webApplicationURL
 
foreach($site in $webApp.Sites)
{
    foreach($subWeb in $site.AllWebs)
    {
       if(($subWeb.Url.Split("/") | measure-object).Count -lt 5)
{
        $output += $subWeb.Url + "`r`n`r`n"
        foreach($group in $subWeb.Groups)
        {
            if($group.Name -like "*Owners*")
            {
                $output += "Owner(s): " + "`r`n`r`n"
                foreach($user in $group.Users)
                {$output += $user.Name + " - " + $user.Email + "`r`n`r`n"; }
            }
        }
}
    }
    if($subWeb.IsRootWeb -ne $true)
    {
        IterateSubSites($subWeb)
    }
    $subWeb.Dispose()
}
$site.Dispose()
$output | Out-File "C:\owners.txt" 

Can not convert claims identity to windows token. This may be due to user not logging in using windows credentials.

Can not convert claims identity to windows token. This may be due to user not logging in using windows credentials.

saml-ssrs-before

If you receive this message when trying to run a report after upgrading your SharePoint environment to 2013, make sure that you have enabled the Claims To Windows Token Service on the SAME server that you have Reporting Services running on.  This will take care of that error.

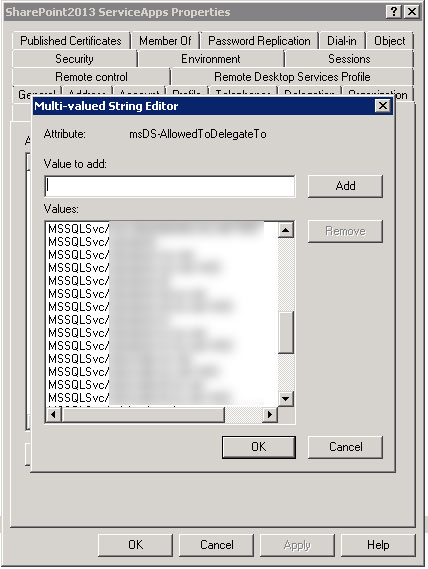
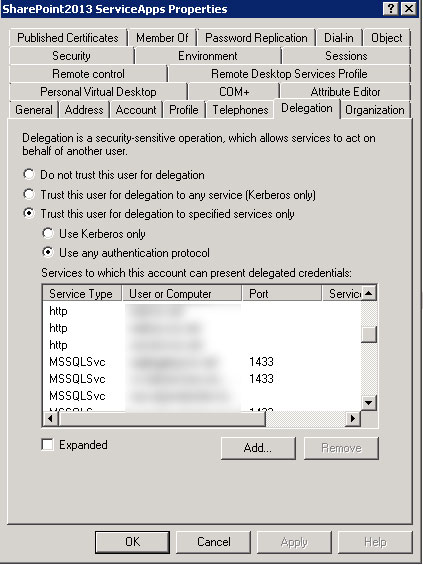
If after that you receive an error message indicating that you cannot logon as “NT Anonymous” you will further need to go in and set up your SharePoint Service account to have “AllowedDelegateTo” permission to the SQL Server you are trying to connect to.

In Active Directory Users and Computers, change the msDS-AllowedToDelegateTo attribute to include entries to your SQL Server(s).

msds-allowedtodelegateto

You may also wish to set it to allow any protocol.

useanyauth

Provision Search Service On Any SharePoint Server (with no migration)

This is based on scripts at http://www.harbar.net/articles/sp2013mt.aspx. I have modified the original script because if you are provisioning this on a server that is not the Central Admin server, you may get some NULL errors when you try to complete the component steps.  I have highlighted the part that I have changed.

This script will allow you to provision the search service application on any server of your choosing. Before you run this script, make sure you have activated the following services in Central Admin on the server you wish to set up your SSA on.

Search Host Controller Service
Search Query and Site Settings Service

$saAppPoolName = "Default SharePoint Service App Pool"
$searchServerName = (Get-ChildItem env:computername).value
$serviceAppName = "Search Service Application"
$searchDBName = "SearchService_DB"
$saAppPool = Get-SPServiceApplicationPool $saAppPoolName
Start-SPEnterpriseSearchServiceInstance $searchServerName
Start-SPEnterpriseSearchQueryAndSiteSettingsServiceInstance $searchServerName
$searchServiceApp = New-SPEnterpriseSearchServiceApplication -Name $serviceAppName -ApplicationPool $saAppPoolName -DatabaseName $searchDBName
$searchProxy = New-SPEnterpriseSearchServiceApplicationProxy -Name "$serviceAppName Proxy" -SearchApplication $searchServiceApp
$clone = $searchServiceApp.ActiveTopology.Clone()
$searchServiceInstance = Get-SPEnterpriseSearchServiceInstance | where-object{$_.Server.Name -eq $searchServerName}
New-SPEnterpriseSearchAdminComponent –SearchTopology $clone -SearchServiceInstance $searchServiceInstance
New-SPEnterpriseSearchContentProcessingComponent –SearchTopology $clone -SearchServiceInstance $searchServiceInstance
New-SPEnterpriseSearchAnalyticsProcessingComponent –SearchTopology $clone -SearchServiceInstance $searchServiceInstance 
New-SPEnterpriseSearchCrawlComponent –SearchTopology $clone -SearchServiceInstance $searchServiceInstance 
New-SPEnterpriseSearchIndexComponent –SearchTopology $clone -SearchServiceInstance $searchServiceInstance
New-SPEnterpriseSearchQueryProcessingComponent –SearchTopology $clone -SearchServiceInstance $searchServiceInstance
$clone.Activate()

Automatically Filing SharePoint Documents After Timespan

1) Set up a Document Library that will house the “temporary” documents (ie. the documents that you plan on having automatically filed).  For instance “New Documents.”

2) Then set up a separate “Custom” list that you will use as your routing list.  In this list enter all the names of the various other document libraries that you want to file your documents to.  For instance “Tax Records” and “Property Records.”

createcustomlist

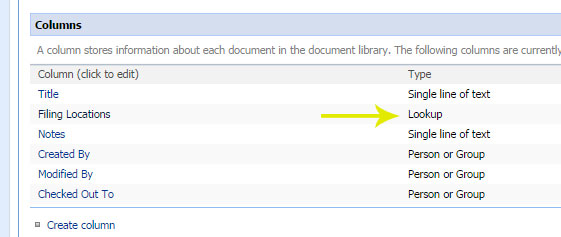
3) Go back to your “New Documents” library that you just created, and add a new column under “Document Library Settings.”  Give it a content type of “Lookup”, and tie it to the list you created in step 2.  Call it “Filing Location.”  *This can also be done with metadata if you have it enabled.

createlookupcolumn

4) Now that you have your infrastructure set up, it is time to create a workflow to automatically file the documents.  Open SharePoint Designer, and browse to your site. Choose to create a new workflow.

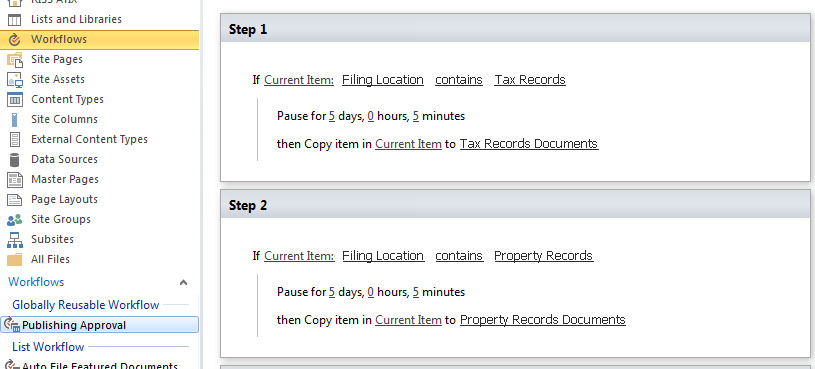
5) Link the workflow to your “New Documents” library.  Choose to activate the workflow whenever a new item is added. Enter the workflow steps in the following format:

  • Choosing to examine the “Filing Location” column.
  • If it matches one of the types you identify, choose to pause it for the time you desire to have it displayed in the “New Documents” library.  In this case, I will choose 5 days.
  • Then have the workflow copy the document (“Current Item”) to the desired matching document library.

filingworkflow

6) Repeat the previous step as many times as is necessary for the different document libraries you wish to file your documents to.

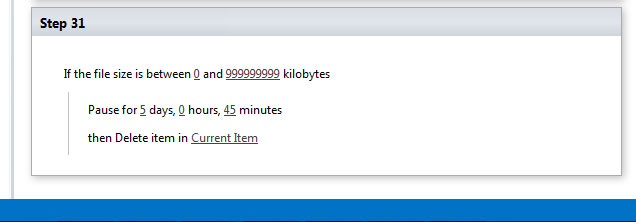
7) Finally, for the last step, choose to examine the file, and then pause it for a time period greater than the time you chose for step 5. Then add an instruction to delete the item after that time has passed.

deletionworkflowstep

8) Save the workflow.

9) Now when you add documents to the “New Documents” folder, they will be automatically filed.  However, when you upload them, you will also need to choose where they get filed under the “Filing Locations.”